


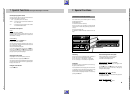


GV44…, GV45…, GV46… Servicehinweise / Service Instructions
GRUNDIG Service-Technik 1 - 61
Service Instructions
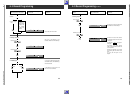
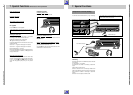
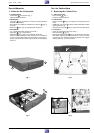
1. Removing the Cabinet Parts
1.1 Cabinet Upper Part
– Undo 4 screws
A
(Fig. 1).
– Lift off the cabinet upper part.
1.2 Bottom Panel
– Remove 4 inserts
B
(Fig. 2) and undo the screw lying below each
insert.
– Additionally, undo screw
C
at video recorders fitted with a bottom
masking panel (Fig. 2).
– Release the locking lugs
D
(Fig. 2) and remove the bottom panel.
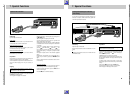
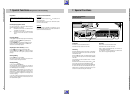
1.3 Front Panel
– Pull off the Jog/Shuttle buttons (for GV46…).
– Undo the screws
E
(Fig. 3).
– Release the locking catches
F
(Fig. 3) and remove the front panel.
Note: When attaching the front panel from the front to the video
recorder press the cassette lid inwards so that the lever engages
with the guide (Fig. 4) of the cassette lid.
Servicehinweise
1. Entfernen der Gehäuseteile
1.1 Gehäuseoberteil
– 4 Schrauben
A
herausdrehen (Fig. 1).
– Gehäuseoberteil abnehmen.
1.2 Bodenblech
– 4 Einlagen
B
(Fig. 2) abnehmen und die je darunter befindliche
Schraube herausdrehen.
– Bei Geräten mit Fußblende zusätzlich die Schraube
C
(Fig. 2)
entfernen.
– Rastnasen
D
lösen (Fig. 2) und Bodenblech abnehmen.
1.3 Frontblende
– Jog- / Shuttle-Drehknöpfe abziehen (bei GV46…).
– Schrauben
E
(Fig. 3) herausdrehen.
– Rasthaken
F
(Fig. 3) lösen und Frontblende abnehmen.
Hinweis zum Zusammenbau: Beim Aufstecken der Frontblende
von vorne auf das Gerät ist die Cassettenklappe so nach innen zu
drücken, daß der Hebel in die Führung (Fig. 4) der Cassettenklappe
eintaucht.
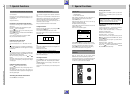
Fig. 4
BB
C
D
F
E
F
E
E
F
Fig. 1 Fig. 2
A
A
Fig. 3
F