


English
37
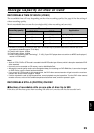
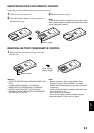
SETTING DATE AND TIME
Set the current date and time so that the date and time you make a recording can be recorded correctly.
The following procedure can also be used to correct the date and time you have already set.
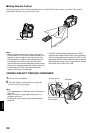
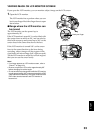
1 Turn the DVD video camera/recorder on.
2 Press the MENU button.
The menu screen will
appear.
3 Use the joystick to choose
“Date Setup” and then
“Date Set”.
4 Tilt the joystick to right.
The figure for the month
will be selected.
[The digit that is
highlighted first
depends on the date
display format (set up in Date Mode): The digit
on the left end of the date display will be first
highlighted.]
Note:
After setting the figure for the month, tilt the joystick to
right to select the digit to be set. If you press the
A
button after selecting the figure for the month, the
screen for verifying the set date will appear instead of
screen for setting day, year or time.
5 Tilt the joystick to left or
right to select the digit
you want to set in
sequence.
Tilt the joystick up or
down to select the
number for current date/time, and then repeat
step 5 to set the current date and time.
Note:
To stop date/time setting midway, press the C button.
6 After setting the current
date and time, press the
A button.
The screen for verifying
the set date will appear.
7 If the displayed date and time are correct, use
the joystick to choose “YES”, and then press the
A button.
The date and time will be set, and the DVD
video camera/recorder will enter the recording
pause status.
Choosing “NO” will restore the menu screen.
Note:
This DVD video camera/recorder incorporates a
rechargeable battery to store the date and time in memory.
If this built-in battery is exhausted, the date and time will
be reset. To prevent this, connect the AC adapter/charger
to DVD video camera/recorder every 3 months, and leave
them for at least 24 hours with the DVD video camera/
recorder turned off: The built-in battery will be charged.
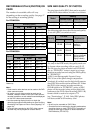
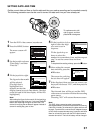
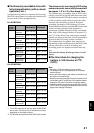
Tilt up/down and to left/
right to select, and then
press
A to designate.
Ca
m
era Functions Setup
Progra
m
AE : Auto
W
hite Bal. : Auto
Dig.Z
oom
: 40x
M
IC.Fi lter :
O
ff
16:9
:
O
ff
EIS :
O
n
ENTER RETURN
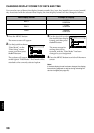
RAM
Da te Se t up
RAM
Date Mode
Date Set 1/ 1/2004
ENTER RETURN
12:00AM
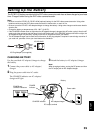
RAM
Date Mode
ENTER RETURN
Date Set 1/ 1/2004
12:00AM
Da te Se t up
RAM
8:00AM
Date Mode
ENTER RETURN
Date Set 9/30/2004
Da te Se t up
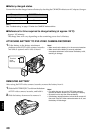
ENTER
RAM
9/30/2004 8:00A
M
Date set up?
YES NO
Da te Se t