


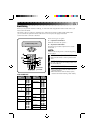


61
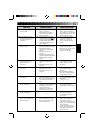
TROUBLESHOOTING
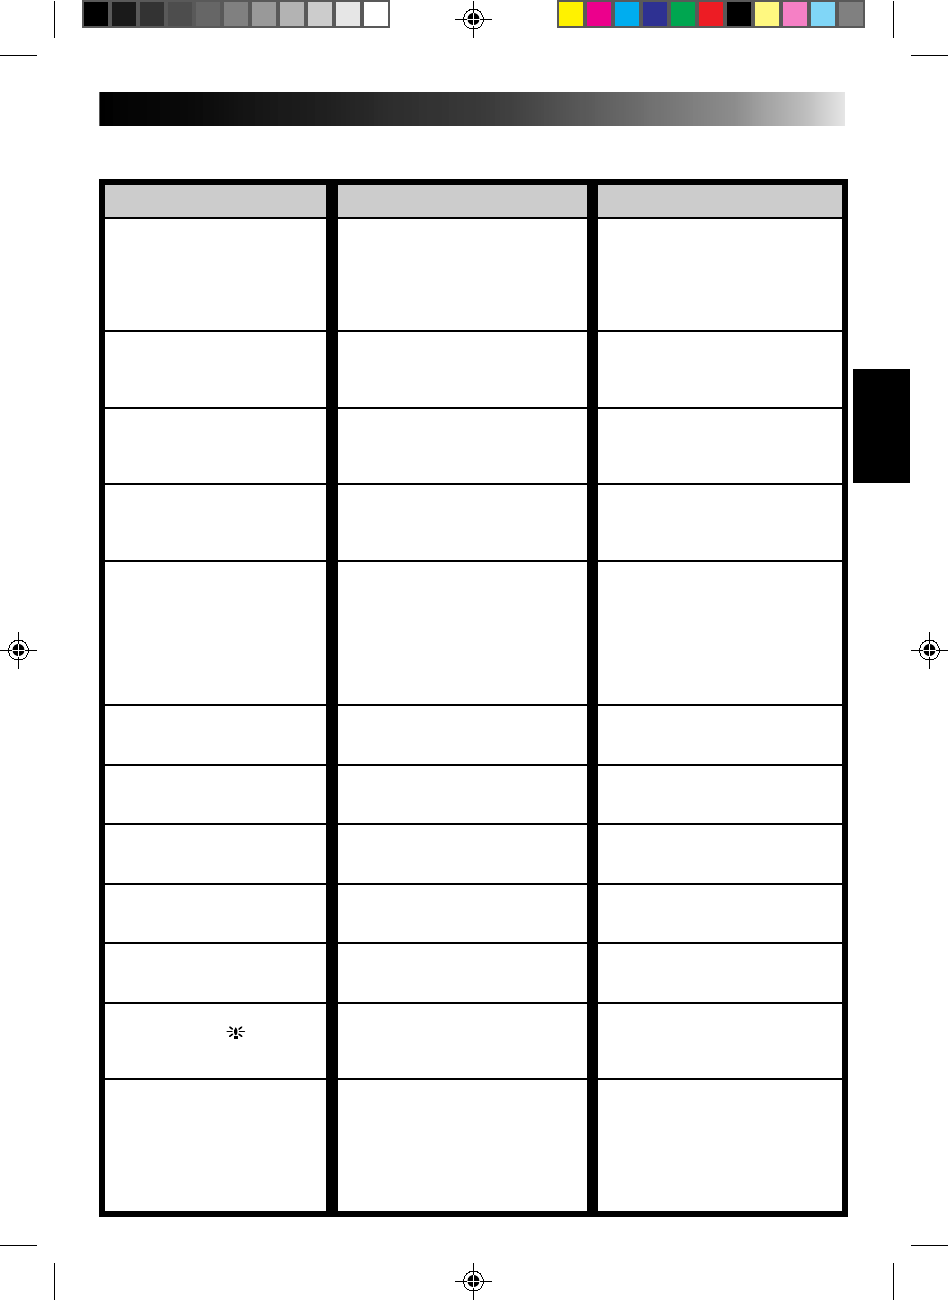
SYMPTOM POSSIBLE CAUSES CORRECTIVE ACTION
1.
No power is supplied.
2.
Recording cannot be
performed.
3.
There is no playback
picture.
4.
Some functions are not
available.
5.
The focus does not adjust
automatically.
6.
The cassette won’t load
properly.
7.
Play, Rewind and
Fast-Forward functions
don’t work.
8.
The tape is moving, but
there’s no picture.
9.
When shooting a subject
illuminated by bright
light, vertical lines appear.
10.
In the 5-Second mode,
recording ends before 5
seconds have elapsed.
11.
Even though “GAIN UP”
was set to “
A
”, scenes
shot in dark places are
not brightened.
12.
Snapshot mode cannot be
used.
1.
•The power is not connected
properly.
•The battery is dead.
•The viewfinder hasn’t been
pulled out.
2.
•The tape’s record safety tab
is set to “SAVE”.
•The Power Dial is set to
“PLAY”.
3.
•The camcorder is not getting
power, or some other
malfunction exists.
•The lens cover is closed.
4.
•The Select Dial is set to
“AUTO”.
•The Power Dial is set to “5S”.
5.
•Focus is set to “MANUAL”.
•The recording was done in a
dark place, or the contrast
was low.
•The diopter is not properly
adjusted.
•The lens is dirty or covered
with condensation.
6.
•The cassette is in the wrong
position.
•The battery’s charge is low.
7.
•The Power Dial is not set to
“PLAY”.
•The cassette’s cover is open.
8.
•Your TV has AV input
terminals, but is not set to
its VIDEO mode.
9.
•This is a result of
exceedingly high contrast,
and is not a malfunction.
10.
•The 5-Second mode in the
System Menu is set to
“ANIMATION”.
11.
•Depending on the light source,
the 1/30 shutter speed may be
deactivated in order to reduce
the shakiness in the picture.
12.
•P.AE/Effects Sepia,
Monotone or Slow (Slow
Shutter) are activated.
•The Squeeze mode is
selected.
•The Cinema mode is engaged,
disabling the white border.
1.
•Connect the AC Adapter
securely (
੬ pg. 12).
•Replace the dead battery
with a fully charged one
(
੬ pg. 11).
•Pull the viewfinder out.
2.
•Set the tape’s record safety
tab to “REC” (
੬ pg. 15).
•Set the Power Dial to
“REC”.
3.
•Turn the camcorder’s power
off and on again.
•Pull out the viewfinder to
open the lens cover.
4.
•Set the Select Dial to any
position except “AUTO”.
•Set the Power Dial to any
position except “5S”.
5.
•Set Focus to “AUTO”
(
੬ pg. 39).
•Adjust the diopter
(
੬ pg. 16).
•Clean the lens and check
the focus again.
6.
•Set it in the right position.
•Install a fully charged
battery.
7.
•Set the Power Dial to
“PLAY”.
8.
•Set the TV to the mode or
channel appropriate for
video playback.
9.
————
10.
•Select “5S” or “5SD” in the
System Menu.
11.
————
12.
•Disengage them.
•Disengage the Squeeze
mode.
•Disengage the Cinema
mode.
If, after following the steps in the chart below, the problem still exists, please consult your nearest JVC
dealer or Technical Service Center.