


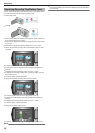
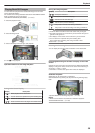
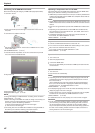


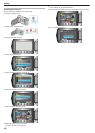

Connecting via the HDMI Mini Connector
We recommend using the Category 2 HDMI cable (High Speed cable).
1
Connect to the TV.
.
●
Press and hold the power button M for 2 seconds or more to turn off
the power.
2
Connect the AC adapter to this unit.
.
●
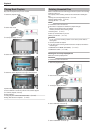
Set “ON-SCREEN DISPLAY” in the menu to “DISPLAY ALL” or “DIS-
PLAY DATE ONLY”.
"ON-SCREEN DISPLAY" (A P.91)
3
Press the external input button on the TV to switch to the input from
this unit via the connected terminal.
.
4
Play back a file.
.
"Playing Back Videos" (A P.36)
"Playing Back Still Images" (A P.39)
NOTE:
●
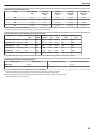
Change the settings in “HDMI OUTPUT” according to the connection.
"HDMI OUTPUT" (A P.104)
●
When connecting to the HDMI mini cable, the image or sound may not
appear on the TV properly depending on the TV connected. In
such cases, perform the following operations.
1) Disconnect the HDMI mini cable and connect it again.
2) Turn off and on this unit again.
●
Connecting this unit to an HDMI-CEC-enabled TV using the HDMI ca-
ble allows you to utilize the following convenient functions.
"Operating in Conjunction with TV via HDMI" (A P.42)
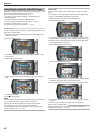
Operating in Conjunction with TV via HDMI
Connecting this unit to an HDMI-CEC-enabled TV using the HDMI cable
allows you to utilize the following convenient functions.
●
HDMI-CEC (Consumer Electronics Control) is an industry standard that
enables interoperability between HDMI-CEC compliant devices that are
connected via HDMI cables.
NOTE:
●
Not all HDMI-control devices comply with the HDMI-CEC standard. The
HDMI control function of this unit will not work when connected to these
devices.
●
This unit is not guaranteed to operate with all HDMI-CEC-enabled devi-
ces.
●
Depending on the specifications of each HDMI-CEC-enabled device,
some functions may not work with this unit. (For details, refer to the in-
struction manual of your TV.)
●
Unintended operations may occur with some connected devices. In
these cases, set “HDMI CONTROL” to “OFF”.
"HDMI CONTROL" (A P.105)
Preparations
●
Connect an HDMI cable between this unit and the TV.
●
Turn on the TV and set the HDMI-CEC related setting to “ON”. (For de-
tails, refer to the instruction manual of the TV.)
●
Turn on this unit and set “HDMI CONTROL” to “ON”.
"HDMI CONTROL" (A P.105)
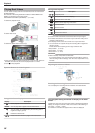
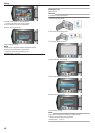
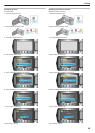
Operation Method 1
1
Turn on this unit.
2
Select the playback mode.
3
Connect the HDMI cable.
●
TV turns on automatically and switches to HDMI input mode when this
unit is turned on.
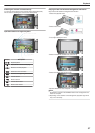
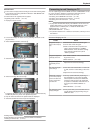
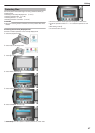
Operation Method 2
1
Turn off the TV.
●
This unit turns off automatically.
NOTE:
●
Depending on the TV connected, the display language of this unit will
automatically switch to the language that is selected for the TV when
this unit is turned on.
(This is applicable only if this unit supports the language selected for
the TV.) To use this unit with a language that differs from the display
language of the TV, set “HDMI CONTROL” to “OFF”.
"HDMI CONTROL" (A P.105)
●
The display language of the TV will not switch automatically, even if the
display language of this unit is changed.
●
These functions may not work correctly when devices such as amplifier
and selector are connected. Set “HDMI CONTROL” to “OFF”.
"HDMI CONTROL" (A P.105)
●
If HDMI-CEC does not work properly, turn off and on this unit again.
CAUTION:
●
Do not remove the recording medium or perform any other operation
(such as turning off the power) while accessing files. Also, be sure to
use the provided AC adapter, as the data on the recording medium
may be corrupted if the battery becomes exhausted during operation. If
the data on the recording medium becomes corrupted, format the re-
cording medium to use the medium again.
Playback
42