


[b)
J
I~_::-"W-
.+--
[a]
[C]-~HI
5
r
••
1+-
.+--
[d)
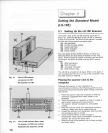
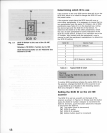
SCSI
10
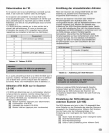
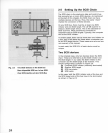
Fig.
2.3
SCSI ID Switch on the
rear
of the LS-10E
Scanner
18
Selecteur d'iO SCSI
Ii
I'arriere
du LS-10E
SCSI-Adressenschalter an
der
Riickseite des
Scanners
LS-1
DE
Determining
which
10
to
use
If
the scanner is the
only
SCSI device
that
will
sit
on the
SCSI bus, there is no need to change the SCSI
10 from
the preset value.
If the scanner must share the SCSI bus with one
or
more
other
peripherals
, it is necessary to insure that no
two
peripherals
have the same 10. Create a
list
of SCSI
peripherals
(see Table 2.
1)
on the desired bus, noting
the device type and the SCSI
10
of
that
device. To
determine
the SCSI 10 of the
other
peripherals
, check
the
rear
of each peripheral for some indication of the
SCSI
10 of that device. If there is no indication as to the
10
number
, then consult with the
peripheral's
user
's
manual
or
call the peripheral manufacturer to
determine
the SCSI 10 setting.
SCSI
10 Device Type
o
Computer (default)
2
3
4
5 LS-10 Scanner (default)
6
7
Table
2.1
Typical SCSI
10
chart
Warnlngl
Never
change the SCSI 10
of
a
device
with
the
computer
running.
If another SCSI peripheral shares the
same
SCSI 10 as
the scanner, change the SCSI
10 of the
scanner
to an
unused SCSI
10 as indicated in the
following
section.
Note any changes in Table 2.1.
Setting the SCSI 10 on
the
LS-10E
scanner
The SCSI 10 is set via a switch on the back of the
scanner as shown in Fi
gure
2.3. Simply push the button
below the SCSI
10
number
indicator to increment the
SCSI
10
.
Similarly
, push the button above the
indicator
to decrement the SCSI 10.
[a]
Top button (push to decrement)
[b]
SCSI 10 switch
[c]
SCSI 10 # indicator
[d]
Bottom button (push to increment)