


22
Using the Menu Screen
To facilitate the selection of a desired function or setting, this
Palmcorder displays various function settings on menus.
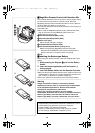
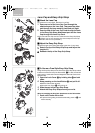
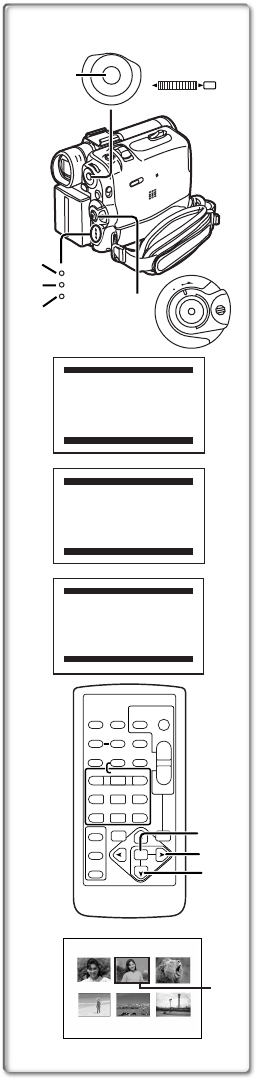
1 Press the [MENU] Button.
≥The Menu corresponding to the Mode selected by using the
[OFF/ON/MODE] Switch
1 is displayed.
≥When the [CAMERA] Lamp is on, the Camera Function Menu
is displayed.
2
≥When the [VCR] Lamp is on, the VCR Function Menu is
displayed.
3
≥When the [CARD PB] Lamp is on, the Card Function Menu is
displayed.
4
2
Rotate the [PUSH] Dial to select a desired Sub-Menu.
3 Press the [PUSH] Dial to display the selected
Sub-Menu.
4 Rotate the [PUSH] Dial to select the item to be set.
5 Press the [PUSH] Dial to set the selected item to a
desired Mode.
≥With each press of the [PUSH] Dial, the cursor [1] brings up a
subsequent Mode. Menu items that cannot be used in
combination with the selected menu items are displayed in
dark blue.
≥While a Menu is displayed, you cannot begin to record or play
back. Menus can be displayed during playback but not during
recording.
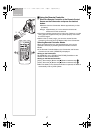
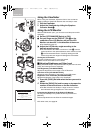
≥The above operations can be carried out using the Remote
Controller. (l 15)
≥To display the Menu, press the [MENU] Button
5 on the
Remote Controller.
≥To select items on the Menu, press the [ITEM] Button
6
on the Remote Controller.
≥To set the mode for the selected items, press the [SET]
Button
7 on the Remote Controller.
To Exit the Menu Screen
Press the [MENU] Button again.
About the Menu Mode Setting
The setting selected on the Menu will be retained even when the
Palmcorder is turned off. (But, the setup of [EFFECT2] (l 39) will
not be retained.) If, however, the Battery or AC Adaptor is
disconnected before turning the Palmcorder off, the selected setting
may not be retained.
≥Menu operation flow is shown in this text by >>.
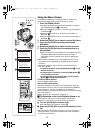
ªFile Selection in the Card Playback Mode (l 58)
A File Selection Operation may be necessary during Menu
Operations. In this case, carry out the following procedure.
1 Turn the [PUSH] Dial and select a file.
≥The selected file is marked by a frame 8.
2 Press the [PUSH] Dial to confirm the selection of the
file.
≥After the above File Selection Procedure, carry out the various
Menu Operations. (The above procedure will not be repeated in
the following instructions.)
2
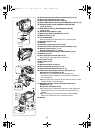
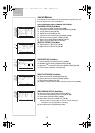
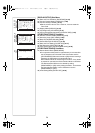
CAMERA FUNCTIONS
PUSH MENU TO EXIT
1.
CAMERA SETUP
2.
DIGITAL EFFECT
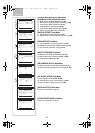
PUSH MENU TO EXIT
2.
DIGITAL EFFECT
3.
CARD SETUP
4.
MULTI-PICTURES
5.
RECORDING SETUP
6.
AV IN/OUT SETUP
7.
DISPLAY SETUP
8.
OTHER FUNCTIONS
1.
PLAYBACK FUNCTIONS
CARD FUNCTIONS
PUSH MENU TO EXIT
1.
DELETE CARD FILE
2.
CARD EDITING
3.
DISPLAY SETUP
4.
OTHER FUNCTIONS
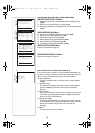
VCR FUNCTIONS
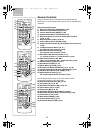
3
4
3.
CARD SETUP
4.
MULTI-PICTURES
6.
DISPLAY SETUP
7.
OTHER FUNCTIONS1
8.
OTHER FUNCTIONS2
5.
RECORDING SETUP
2, 3, 4, 5
1, 2
2
3
4
PICTURE
No.25 100-0012
8
ZOOM
INDEX INDEX
SELECT
STORE
STOP
KL
∫
OSD
COUNTER
V
/REW
STILL ADV
OFF/ON
P.B.DIGITAL
DATE/
TIME
RESET
TITLE
T
W
sVOL r
¥REC
MULTI/
P-IN-P
PHOTO
SHOT
START/
STOP
A.DUB
PLAY
PAUSE
FF/
W
STILL ADV
MENU
ITEM
SET
615
;
ED
VAR.
SEARCH
P.B.
ZOOM
5
7
6
O
F
F
O
N
M
O
D
E
CAMERA
VCR
CARD
PB
M
E
N
U
PUSH
MF / VOL / JOG
W.B / SHUTTER / IRIS
1
1
PV-GS50P.book 22 ページ 2003年2月17日 月曜日 午後6時30分