


41
Playback
Playback Operation
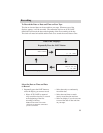
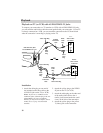
1. Set the CHANNEL 4CH/3CH switch
on the RF output adapter to
CHANNEL 4CH or 3CH.
2. Turn on the TV, and tune it to the same
channel you selected with the RF
output adapter’s CHANNEL switch.
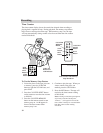
3. Slide the POWER switch up to turn on
the camcorder.
4. Press the VCR/CAM button to place
the camcorder in the play mode. The
green VCR indicator will light.
5. Press the PLAY button.
• During playback, use the playback
features on page 37.
6. Press STOP on the camcorder when
you are finished.
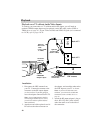
Viewing What the Camcorder Is Recording
1. Turn on the TV and tune it to channel
3 or 4. When the camcorder is used as
a camera, turn the TV’s volume down
to prevent a high-pitched squeal
caused by feedback.
2. Set the CHANNEL 4CH/3CH switch
on the RF output adapter to the same
channel you selected on the TV.
3. Slide the POWER switch up to turn on
the camcorder. The red CAM
indicator will light.
Note: When the camcorder is used as a
camera, turn the TV’s volume down to
prevent a high-pitched squeal caused by
feedback.
4. Press the REC START/STOP button
(thumb trigger) to begin recording.
You can watch what the camcorder is
seeing (or recording) on the
TV screen.
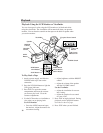
Normal TV Viewing
For normal TV viewing, you may leave
the RF output adapter hooked up to the
TV. Disconnect the adapter’s plug from
the camcorder or turn off the camcorder.
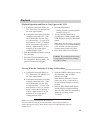
Note to Cable TV Installer
This reminder is provided to call your attention to Article 820-40 of the National Electrical
Code (Section 54 of Canadian Electrical Code, Part I), that provides guidelines for proper
grounding and, in particular, specifies that the cable ground shall be connected to the
grounding system of the building as close to the point of cable entry as practical.
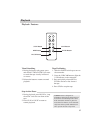
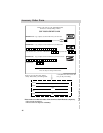
Note: The remote will also operate the camcorder.
Press the DISPLAY button to have the camcorder’s displays appear on the TV
screen. During tape copying, these displays will be recorded when they appear on
the TV screen.