


17
Getting Started
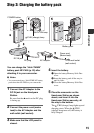
To use a power source from a wall
outlet (wall socket)
Make the same connections as you do when
charging the battery pack. The battery pack
will not lose its charge in this case.
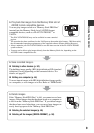
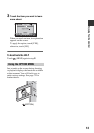
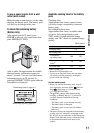
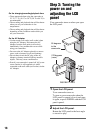
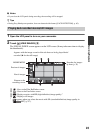
To check the remaining battery
(Battery Info)
After opening the LCD panel, press
POWER to turn off your camcorder, then
press DISP/BATT INFO.
After a while, the approximate recordable
time and battery information appear for
about 7 seconds. You can view the battery
information for up to 20 seconds by
pressing DISP/BATT INFO again while the
information is displayed.
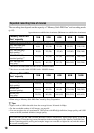
Available running time for the battery
pack
Charging time:
Approximate time (min.) required when
you fully charge a completely exhausted
battery pack.
Recording/Playback time:
Approximate time (min.) available when
you use a fully charged battery pack.
“HD” stands for high definition image
quality, and “SD” stands for standard image
quality.
(Unit: min.)
*1
[REC MODE]: SP
*2
When the LCD backlight is on.
*3
Typical recording time shows the time when
you repeat recording start/stop, turning the
power on/off and zooming.
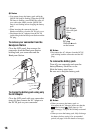
On the battery pack
• When you remove the battery pack, turn off
your camcorder, and turn off the (Movie)
lamp/ (Still) lamp (p. 19)/access lamp
(p. 21)/QUICK ON lamp.
• The /CHG (charge) lamp flashes during
charging, or Battery Info (p. 17) will not be
correctly displayed under the following
conditions:
– The battery pack is not inserted correctly.
– The battery pack is damaged.
– The battery pack is worn-out (For Battery
Info only).
• The power will not be supplied from the battery
as long as the AC Adaptor is connected to the
DC IN jack of your camcorder or the Handycam
Station, even when the power cord (mains lead)
is disconnected from the wall outlet (wall
socket).
Remaining battery (approx.)
Recording capacity (approx.)
HD SD
Charging time 135
Recording time*
1
*
2
Continuous
recording time
100 120
Typical recording
time*
3
50 60
Playback time*
2
135 145