Operations
Playing Back Recorded Images
22
Cleanup all recording older than/until: Set the
storage duration of recordings (days). The
recordings older than the set days will be
deleted automatically.
3
Click OK.
To close the dialog without deleting, click Cancel.
Exporting to an AVI File
You can export a recorded file to the AVI format.
1
Search for and select the recording you want to
export in the Search Recording window.
For searching for the recording, see “Searching for
Recordings” on page 17.
2
Display the preview image of the selected recording
by clicking the (Preview Selected Recording)
button on the Search Recording toolbar.
3
Play back the recording using the buttons on the
Playback toolbar.
4
Specify the part of the recording you want to export
while observing the playback image.
Click the (Mark In for Exporting) button on the
search recording toolbar at the scene you want to
start export.
Click the (Mark Out for Exporting) button on
the search recording toolbar at the scene you want
to finish export.
Tips
• Set the export start and end positions immediately
before exporting, because they are not stored in
memory.
• The arrows indicating the export start and end
positions are displayed on the timeline of the
Playback toolbar. (The arrows are displayed at
the recording start and end points by default.)
5
Click the (Export Recording) button on the
search recording toolbar.
The Export Recording dialog appears.
6
Set the parameters in the Export Recording
dialog.
For details on each parameter, see “Export
Recording dialog” on page 22.
7
Click Export.
File conversion starts. Watch the progress bar to
monitor the conversion.
8
When the conversion is completed, click Close.
Note
Audio data cannot be converted into an AVI file.
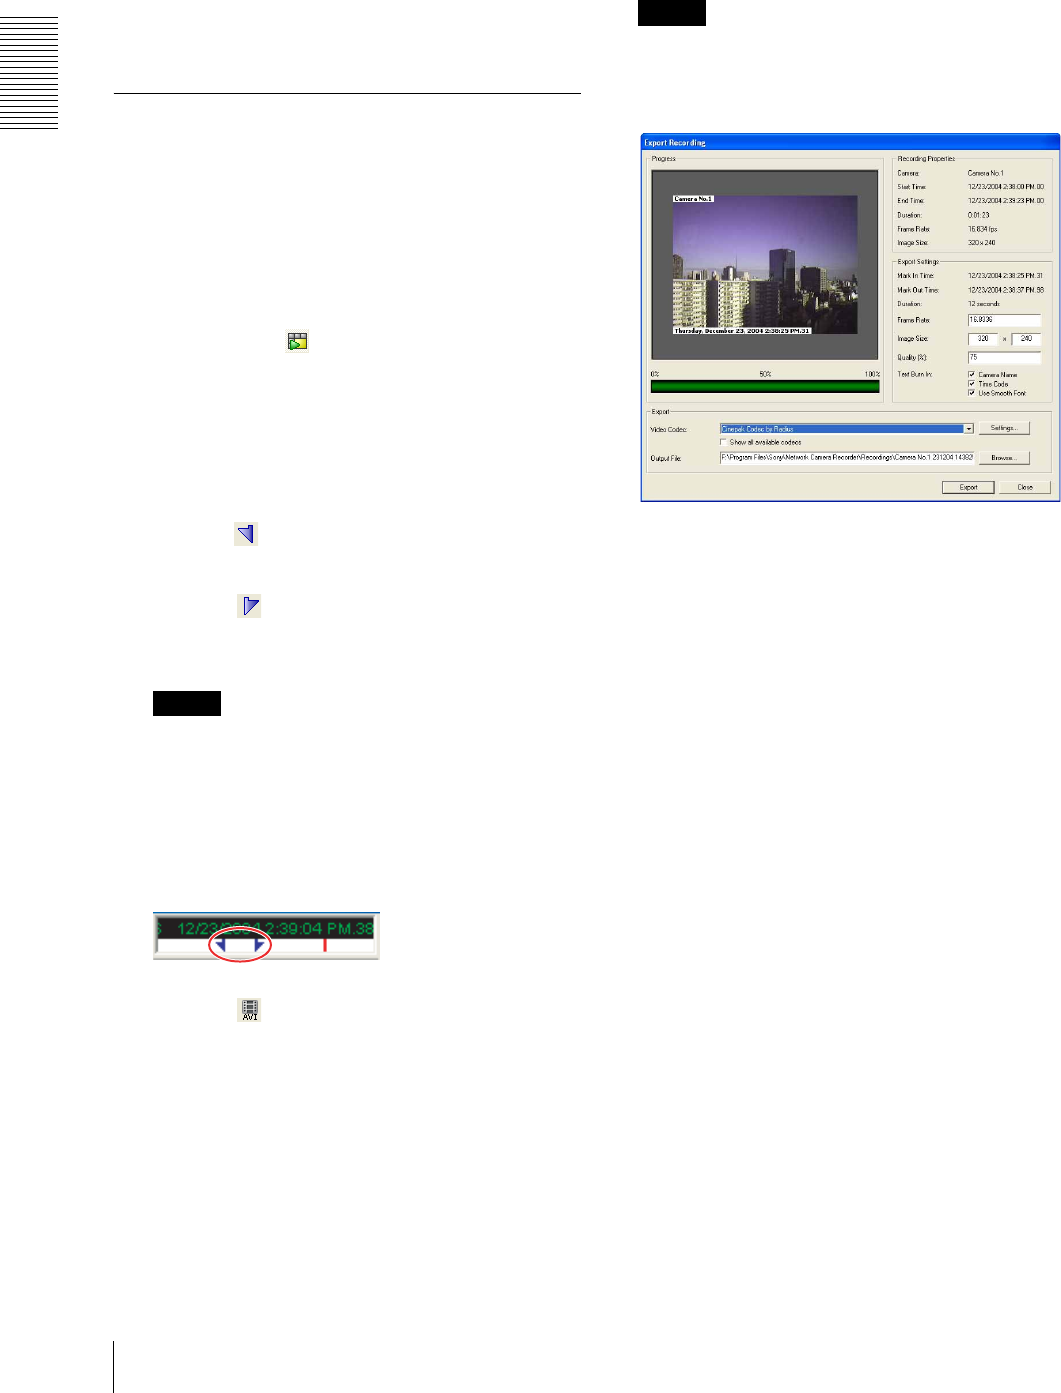
Export Recording dialog
Recording Properties
Displays information on the recording.
Camera: Name of the camera used for recording
Start Time: Recording start date and time
End Time: Recording end date and time
Duration: Recording duration
Frame Rate: Frame rate for recording
Image Size: Image size for recording
Export Settings
Displays export information. Set parameters relating to
exporting.
Mark In Time: Export start time set in the Search
Recording window
Mark Out Time: Export end time set in the Search
Recording window
Duration: Export duration
Frame Rate: Enter the frame rate for exporting.
Image Size: Enter the image size for exporting.
Quality (%): Enter the image quality for exporting
between 0 to 100%. Maximum image quality is
obtained with the 100% setting.
Text Burn In: Select the Camera Name and Time
Code checkboxes if you want to include
information in text format. Select the Use
Smooth Font checkbox if you want to use
Smooth Font.


