


7
Chapter 7 Location and Function of Parts and Controls 128HDC-900/950/930 Series Product Information Manual
Notes
• When you change the shutter speed, ECS
frequency or S-EVS value in the corresponding
mode, the menu block display shows it for a
few seconds.
• When this unit is in RM Configuration Menu
mode, the shutter speed, ECS frequency and
S-EVS value cannot be adjusted.
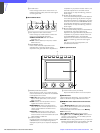
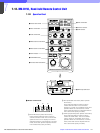
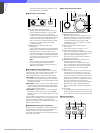
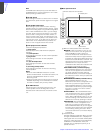
b Filter control block
A ND (ND filter) indicators
The indicator corresponding to the currently
selected ND filter illuminates.
B ND (ND filter select) button
Press and illuminate the button when it is not lit
(Filter camera control mode) to enable filter
selection from this unit. When this button is
illuminated, the ND filter cyclically changes in
the sequence of 1 t 2 t 3 t 4 t 5 t 1 t
... each time it is pressed.
C CC (color temperature conversion filter)
indicators
The indicator that corresponds to the currently
selected CC filter is illuminated.
D CC (color temperature conversion filter select)
button
Press and illuminate the button when it is not lit
(Filter camera control mode) to enable filter
selection from this unit. When this button is
illuminated, the CC filter cyclically changes in
the sequence of A t B t C t D t E t A t
... each time it is pressed.
Notes
• Once you press any of the filter select buttons,
both buttons illuminate. The illumination is
switched off when filter selection is made on
the camera.
• The choice of filters that can be selected
depends on the camera being used. For
available filters, refer to the Operation Manual
of the camera.
• For a camera with four filters, you can change
the function of this button to skip 5 or E and
switch from 4 to1 or from D to A using the RM
Configuration menu. However, when the
connected camera has an automatic filter-
detection facility, setting with the RM
Configuration menu is not required.
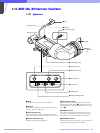
c Paint control block
A AUTO KNEE button (amber illumination)
This button is specified at the factory to turn the
auto knee function on and off. Press and
illuminate the button to turn the auto knee
function on. However, you can use the RM
Configuration menu to change the function that
is turned on/off with this button
B KNEE control
The control is specified at the factory to adjust
the master knee point. However, you can use
the RM Configuration menu to change the
function that is adjusted with this control.
C M GAMMA (master gamma) control
The control is specified at the factory to adjust
the master gamma. However, you can use the
RM Configuration menu to change the function
that is adjusted with this control.
D DETAIL control
The control is specified at the factory to adjust
the detail level. However, you can use the RM
Configuration menu to change the function that
is adjusted with this control.
Note
The adjustment mode of the above three
controls is specified at the factory as Relative
mode, which can be changed to Absolute mode
using the RM Configuration menu. The center
click position of each control is the reference
position in Relative mode. The adjustment range
in Relative mode is also selected using the
menu.
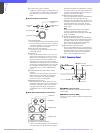
d White balance control block
A WHITE (white balance) controls
Adjusts the R/B white balance. The adjustment
mode of these controls is specified at the factory
as Relative mode, which can be changed to
Absolute mode using the RM Configuration
menu. See ‘Settings on the RM Configuration
Menu’.
B A (memory A) button (amber illumination)
Press and illuminate the button to obtain the
white balance setting stored in memory A of the
camera (Memory A mode). When this button is
illuminated, adjustments made to the white
balance are stored in memory A. Press the
button again to release Memory A mode.
C B (memory B) button (amber illumination)
Press and illuminate the button to obtain the
white balance setting stored in memory B of the
camera (Memory B mode). When this button is
illuminated, adjustments made to the white
balance are stored in memory B. Press the
button again to release Memory B mode.
D AWB (auto white balance) button (red
illumination)
Press to start automatic adjustment of the
selected items. The button is illuminated during
adjustment and this is turned off when
adjustment is complete. If you press the button
while it is illuminated, the automatic adjustment
is canceled and the button flashes. To stop it
flashing, press the button again.
E PRE (preset) button (amber illumination)
Press and illuminate the button to fix the white
balance to 3200K (Preset mode). Press the
button again to release Preset mode.
Note
In Preset mode, manual adjustment with the
WHITE controls and automatic adjustment with
the AWB button are both disabled. When the
adjustment mode of the WHITE controls is
12345 ABCDE
FILTER
ND CC
1
2
3
4
12 3 4
KNEE M GAMMA DETAIL
AUTO
KNEE
WHITE
RB
12345
A
B
PRE
AWB