


Others
Using the SNC toolbox
112
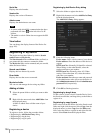
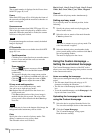
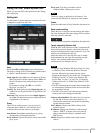
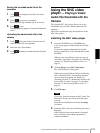
Setting tree
All settings are sorted into categories. Click + to display
the subcategories under a category. Click – to hide the
subcategories.
Select a subcategory to display setting items on the right
side of the screen.
Item
Displays the setting items. Select a line to change its
value.
Value
Displays the value of an item. Select or enter a value to
change the value.
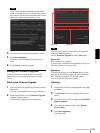
Explanation
Displays the range of value for setting and
supplementary explanations.
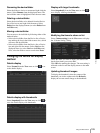
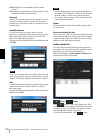
OK
Apply the setting and close the Device Setting screen.
The main screen of SNC Toolbox is displayed.
Cancel
Close the Device Setting screen without changing the
setting. The main screen of SNC Toolbox is displayed.
Apply
Apply the setting.
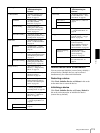
Other settings
See the relevant pages in “Administrating the Camera”
when configuring the settings.
Setting items Pages to refer to in
“Administrating the
Camera”
System “Configuring the System —
System Menu” on page 34
System “System Tab” on page 34
Date “Date & time Tab” on
page 35
Superimpose “Superimpose Tab” on
page 36
Installation “Installation Tab” on
page 37
Initialization “Initialize Tab” on page 38
Device “Setting the Camera Image
and Audio — Camera
Menu” on page 40
Common “Common Tab” on page 40
Picture “Picture Tab” on page 41
Day/Night “Day/Night Tab” on page 44
Video codec “Video codec Tab” on
page 45
Streaming “Streaming Tab” on page 48
Network “Configuring the Network
— Network Menu” on
page 49
Network “Network Tab” on page 49
Wireless “Wireless Tab — Setting of
wireless connection (SNC-
CH240/CH140/CH180/
CH280 only)” on page 51
QoS “QoS Tab” on page 54
IP address
notification
“Dynamic IP address
notification Tab —
Notifying the IP Address”
on page 55
SSL “Setting the SSL function
— SSL Menu” on page 57
Setting “Common tab” on page 57
CA certificate “CA certificate tab —
Adding the CA certificate
for client authentication” on
page 59
802.1X “Using the 802.1X
Authentication Function —
802.1X Menu” on page 62
Common “Common Tab — Basic
setting of 802.1X
authentication function” on
page 63
Client certificate “Client certificate Tab” on
page 64
CA certificate “CA certificate Tab” on
page 65
User “Setting the User — User
Menu” on page 68
Security “Setting the Security —
Security Menu” on page 69
Preset position “Saving the Camera
Position and Action —
Preset position Menu” on
page 70
Tour (position) “Preset tour Tab — Setting a
position tour” on page 71
Setting items Pages to refer to in
“Administrating the
Camera”