


8
Locations of Controls
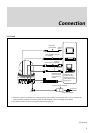
RS-232C/RS-422 select switch
Set to ON to operate colour video camera using the
VISCA command via the RS-422 interface. To change
the mode, turn off the camera (not including standby
mode) first, set the switch and then turn on the camera
again. The mode cannot be switched while the camera is
turned on.
Baud rate select switch
Set to ON for 38,400 bps or OFF for 9,600 bps. To
change the mode, turn off the camera (not including
standby mode) first, set the switch and then turn on the
camera again. Mode switching is not possible while the
camera is turned on.
Switch 5 (Not used)
Be sure to set this switch to OFF.
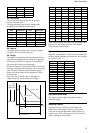
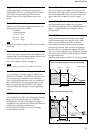
Tripod screw hole
Ceiling bracket mounting screw holes
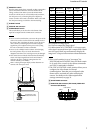
Remote Commander
CAMERA SELECT buttons
Press the button corresponding to the camera you want to
operate with the Remote Commander.
The camera number can be set using the IR SELECT switch
on the rear of the camera.
Note
If two or more cameras are adjacent and have the same
camera number, they are operated simultaneously with the
same Remote Commander. When you install the cameras
close to each other, set different camera numbers.
For the camera number setting, see “Operating Multiple
Cameras with the Remote Commander” described in the
Operating Instructions supplied with the camera.
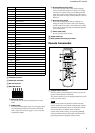
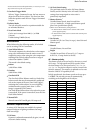
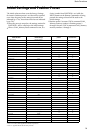
Pin No. Function
1 Data_2-
2 Data_2+
3 Shield (2, 4)
4 No connection
5 No connection
6 No connection
7 No connection
8 Analog Vertical Sync
9 Data_1-
10 Data_1+
11 Shield (1, 3)
12 No connection
13 No connection
14 Power_+5 V
15
GND
16 Hot Plug
17 Data_0-
18 Data_0+
19 Shield (0, 5)
20 No connection
21 No connection
22 Shield Clock
23 Clock+
24 Clock-
C1 Analog Pr
C2 Analog Y
C3 Analog Pb
C4 Analog Horizontal Sync
C5 Analog GND
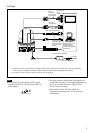
VISCA IN connector
VISCA OUT connector
DC 12V connector
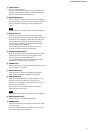
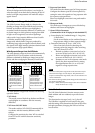
BOTTOM switches
1
2
3
4
5
D70 mode switch
Set to ON to use the VISCA command for EVI-D70/
D70P.
IR OUT switch
Set to ON to enable output of the receiver signals, which
are transmitted from the infrared remote commander
via the VISCA IN connector (page 27), or set it to OFF
to disable the output.