


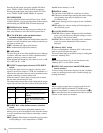

22
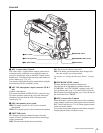
Preparations
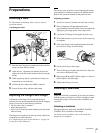
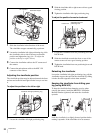
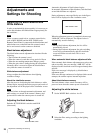
1
Slide the viewfinder in the direction of the arrow.
The viewfinder stopper automatically pops down.
2
Loosen the viewfinder left-right positioning ring, slide
the viewfinder side to side to the most convenient
position and tighten the ring. (See “To adjust the
position to the left or right” below.)
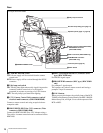
3
Connect the viewfinder cable to the VF connector of
the camera.
4
Connect the microphone cable to the MIC 1 IN
connector of the camera.
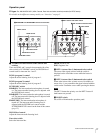
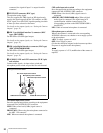
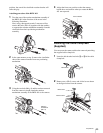
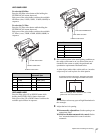
Adjusting the viewfinder position
The viewfinder position may be adjusted towards the front
and rear and to the left and right to make it easy to see into
it.
To adjust the position to the left or right
1
Loosen the viewfinder left-right positioning ring.
2
Slide the viewfinder left or right to move it into a good
viewing position.
3
Tighten the viewfinder left-right positioning ring.
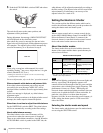
To adjust the position forward or backward
1
Loosen the viewfinder front-rear positioning lever and
LOCK knob.
2
Slide the viewfinder towards the front or rear of the
camera to move it into a good viewing position.
3
Tighten the viewfinder front-rear positioning lever and
LOCK knob.
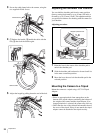
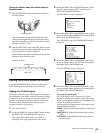
Detaching the viewfinder
Loosen the viewfinder left-right positioning ring, pull the
viewfinder stopper, then pull out the viewfinder by sliding
it in the direction opposite to that when attached.
Keeping the viewfinder from hitting your
leg (using BKW-401)
To keep the viewfinder from bumping your leg when
carrying the camera, install the BKW-401 Viewfinder
Rotation Bracket (optional) and rotate the viewfinder
upwards.
Lock the viewfinder in a slightly forward position before
rotating it upwards. If the viewfinder is in its rearmost
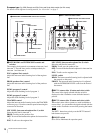
HD
R
Multi Format
R
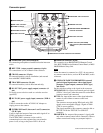
Viewfinder stopper
MIC 1 IN connector
VF connector
Viewfinder left-right positioning ring
Note
Viewfinder front-rear
positioning lever
LOCK knob