


60
Recording – Basic Operations
Chapter 3 Recording and Playback
Leaving the MENU knob in the current position for a
few seconds sets the reference value.
When the RM-B150/B750 Remote Control Unit is
connected
The IRIS control knob of the RM-B150/B750 can be used
for lens iris setting. In this case, the bar display (s) does
not appear.
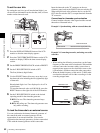
To adjust the iris sensitivity
When you use the VCL-719BXS lens (supplied with
PDW-F335K), you usually need not adjust the iris
sensitivity because lenses are equipped with iris sensitivity
adjustment function.
In auto iris mode, if hunting or response delay happens,
adjust the iris sensitivity using the iris sensitivity trimmer.
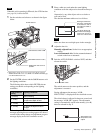
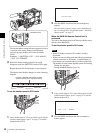
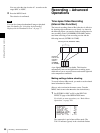
Example: For the lens (VCL-719BXS) supplied
with the PDW-F335K
Remove the rubber cap on the front of the lens drive unit
to reveal the iris sensitivity trimmer. Use a mini-
screwdriver to turn the trimmer. Turn it clockwise to
increase the sensitivity, and turn it counterclockwise to
decrease the sensitivity.
It is recommended that you check the iris sensitivity after
replacing the lens.
The optimum position for the iris sensitivity trimmer
varies depending on the lens.
For more information, refer to the operating instructions
of the lens (or contact the lens manufacturer).
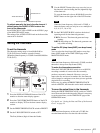
Adjusting the Audio Level
Setting the AUDIO SELECT (CH-1/CH-2) switches to
AUTO automatically adjusts the input levels of the audio
signal to be recorded in audio channels 1 and 2.
To manually adjust the levels of the audio
inputs from the AUDIO IN CH-1/CH-2
connectors
Proceed as follows to adjust the levels of the audio inputs
from the AUDIO IN CH-1/CH-2 connectors, which are to
be recorded in audio channels 1 and 2.
1
Select the audio channel that you want to record in.
For details, see “Selection of the recording audio
input” on page 44.
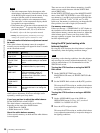
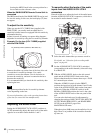
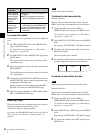
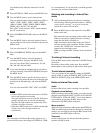
2
Set the AUDIO SELECT (CH-1/CH-2) switch(es)
corresponding to the audio channel(s) selected in step
1 to MANUAL.
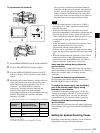
3
With the AUDIO LEVEL knob on the side control
panel and the AUDIO LEVEL knob on the front,
adjust so that the audio level meter shows up to –20 dB
for a normal input volume.
When the AUDIO IN switch is in the FRONT
position, the input level of audio channel 1 and 2 is the
value of the AUDIO LEVEL knob on the front panel
of the unit. When the AUDIO IN switch is in the
REAR or WIRELESS position, the level is the value
of the AUDIO LEVEL knob on the rear panel of the
unit.
You can select the knobs used in adjustments by
changing the settings of MIC CH1 LEVEL, MIC CH2
LEVEL, REAR1/WRR LEVEL, and REAR2/WRR
LEVEL on the AUDIO-2 page of the
MAINTENANCE menu.
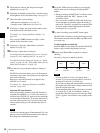
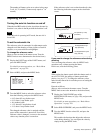
When the top bar (0 dB) turns on, the audio level is too
high. There is no problem if the second bar from the
top turns on.
Note
Iris sensitivity trimmer (labeled S, IRIS GAIN, etc.)
AUTO
CH-1
MANUAL
AUDIO SELECT
AUDIO LEVEL
010010
CH-2
3
2
3