


64
Recording – Basic Operations
Chapter 3 Recording and Playback
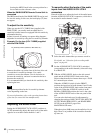
To correct skin detail
You can specify a color other than a skin tone to adjust the
color.
1
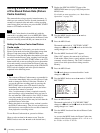
Set SKIN AREA IND to ON on the SKIN DETAIL
page of the PAINT menu.
For details on menu operations, see “Basic Menu
Operations” on page 129.
2
Set SKIN DETECT on the SKIN DETAIL page of the
PAINT menu.
This causes the area detect cursor to be shown in the
viewfinder screen.
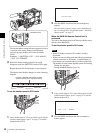
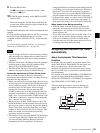
3
Place the area detect cursor on the target, then execute
SKIN DETECT.
This designates the correction area, which is indicated
by a zebra pattern.
4
Change the value of SKIN DTL WIDTH (0 to 359) on
the SKIN DETAIL page so that the zebra pattern may
be displayed in the target area.
Set the correction level beforehand using the SKIN
DETAIL LVL item on the SKIN DETAIL page.
5
When the setting is finished, set SKIN AREA IND to
OFF on the SKIN DETAIL page.
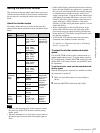
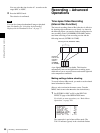
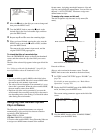
Deleting Clips
With this camcorder you can delete clips one at a time, in
sequence from the last recorded clip, or you
can delete all clips in a single operation.
You can use the THUMBNAIL menu to delete the selected
clip or all clips. For details, see “Deleting Clips” on
page 83.
Locked clips cannot be deleted.
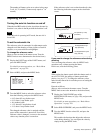
To delete the last recorded clip
Proceed as follows.
(How to select an item in the menu screen: Turn the
MENU knob to move the b mark to the desired item.)
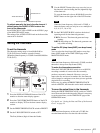
1
Display the DISC page of the USER (or
OPERATION) menu, and press the MENU knob.
For details on menu operations, see “Basic Menu
Operations” on page 129.
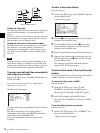
2
Select DELETE LAST CLIP, and press the MENU
knob.
The message “DELETE OK? YES b NO” appears.
3
To execute the deletion, select YES, and press the
MENU knob again.
The last recorded clip is deleted.
4
By repeating steps 2 and 3, you can delete any number
of clips in sequence from the last recorded clip.
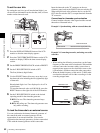
To delete all clips within the disc
The following procedure deletes all unlocked clips.
Proceed as follows.
(How to select an item in the menu screen: Turn the
MENU knob to move the b mark to the desired item.)
1
Display the DISC page of the USER (or
OPERATION) menu, and press the MENU knob.
For details on menu operations, see “Basic Menu
Operations” on page 129.
2
Select DELETE ALL CLIPS, and press the MENU
knob.
The message “DELETE OK? YES b NO” appears.
3
To execute the deletion, select YES, and press the
MENU knob.
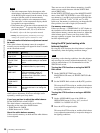
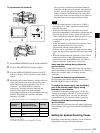
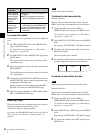
Shooting
conditions
Setting and effect
When adjusting
for skin detail or
tone (Example:
When shooting
to hide skin
details)
Setting: See “To correct skin detail” on
page 64.
Effect: This adjusts the skin detail or
tone to a designated active area.
The 3200K
preset white
balance makes
the picture
reddish.
Setting: Change the setting of the preset
white balance on the PRESET WHT
page of the MAINTENANCE menu.
Effect: This prevents the picture from
reddening.
Note
Note
Clip 1 Clip 2 Clip 3
Clips can be deleted in the sequence 3 t 2 t 1.