


Configuring the Network — Network Setting Page
16
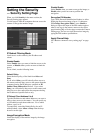
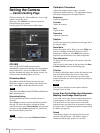
Camera&Sensor
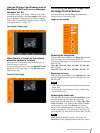
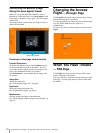
Allows monitoring of the camera image and alarm
output by clicking Sensor 1 and Sensor 2 on the viewer
page, and setting the camera on the Camera Setting
page.
The access right for Administrator is fixed to All,
allowing access to all the functions of the software.
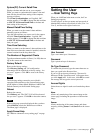
Auto Login
Allows direct logging in the camera without displaying
the Login page, affording the access right for the user
specified in Auto Login User box.
Select Enable to enable the Auto Login function;
Disable to disable it.
Auto Login User
Select the user for the Auto Login function from the
drop-down list: User 1 to User 5. When Auto Login is
set to Enable, the user with the access right specified
here can log in the camera.
Apply/Cancel/Help
See “Buttons common to every setting page” on page
14.
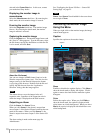
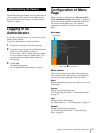
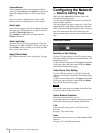
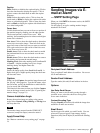
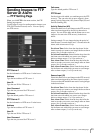
Configuring the Network
— Network Setting Page
When you click Network in the menu section, the
Network Setting page appears.
Use this page to configure the network to connect the
camera and the computer.
You can configure four types of network: LAN, Cable
(Cable Modem), xDSL (Digital Subscriber Line) and
PSTN (conventional analog telephone line). The lower
part of the menu on the Network Setting page will
change automatically according to the selected network
type.
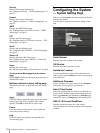
Common Items
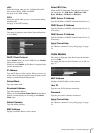
Web Server Port Setting
Type the TCP port number (1 to 65535) used to access
the camera and for the camera to transmit the data. The
default setting is 80.
To make the new setting valid, click Apply at the bottom
of this page, then reboot the camera using the Reboot
button on the System Setting page.
Video Server Port Setting
Type the TCP port number (1 to 65535) used for the
camera to transmit the shot images. The default setting
is 8080.
To make the new setting valid, click Apply at the bottom
of this page, then reboot the camera using the Reboot
button on the System Setting page.
Note
You cannot set the same port number for both the Web
Server Port and the Video Server Port.
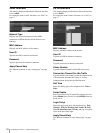
Select Network Interface
Select the network interface you use.
By changing the network interface setting, the lower part
of the menu on this page will change automatically.
LAN
Select this option when you use LAN (Local Area
Network).
See page 17 for LAN setting.
Cable
Select this option when you use a Cable Modem (Cable
Internet).
See page 17 for Cable Modem setting.