


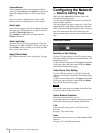

Assigning the IP Address to the Camera Using ARP Commands
28
Others
Assigning the IP
Address to the Camera
Using ARP Commands
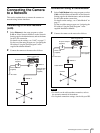
This section explains how to assign an IP address to the
camera using ARP (Address Resolution Protocol)
commands without using the supplied setup program.
For the use of the setup program, see “Assigning the IP
Address to the Camera” in the supplied Installation
Manual.
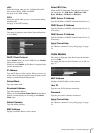
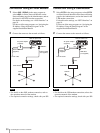
Assigning the IP Address
Open a DOS window and enter the IP address and the
MAC address of the camera you want to assign a new IP
address to, using the following commands.
Example:
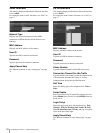
Note
For the details of the use of the ARP commands, refer to
the ARP command help. To display the help, type “arp
-h.”
To enable the DHCP server
If you want to enable the DHCP server when you have
assigned the IP address using ARP commands, proceed
as follows:
1 Access the camera from the browser, then set the
DHCP Client Protocol menu to Enable on the
Network Setting page (see page 17).
2 Clear the ARP cache by using the Arp- d command
or restarting the computer.
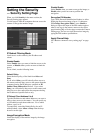
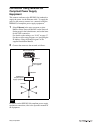
Confirming the Setup
If the IP address is successfully assigned, a message
similar to the following will appear on the screen.
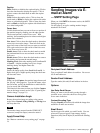
Arp -s <SNC-VL10P IP address> <SNC-VL10P MAC address>
Ping -t <SNC-VL10P IP address>
Arp -s 192.168.0.100 00-00-00-00-00-00
Ping -t 192.168.0.100
Request timed out
:
Request timed out
Reply from 192.168.0.100: bytes=32 time=2ms TTL=255
Reply from 192.168.0.100: bytes=32 time=2ms TTL=255
Ping statistics for 192.168.0.100:
Packets: Sent = 4, Received = 4, Lost = 0 (0% loss),
Approximate round trip times in milliseconds;
Minimum = 1ms, Maximum = 2ms, Average = 1ms