


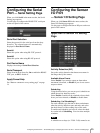

Sending Images via E-mail at Alarm — SMTP Setting Page
21
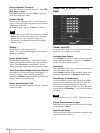
Caption
Show: Enables or disables the caption display. Click to
show the check mark to display the caption. Click it
again to remove the check mark to make the caption
disappear.
Color: Selects the caption color. Click to show the
check mark on White to display the caption with white
letters on a black background. Click to show the check
mark on Black to display the caption with black letters
on a white background.
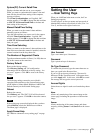
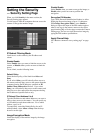
Focus Area
Use this function when you want to focus on a portion of
the monitor image by masking over the other portion.
The focused portion is called “focus area.” With
masking, the transmitting data size reduces and a higher
frame rate is obtained.
New Area: Click to show the check mark to determine
a new focus area on the image. Then left-click on the
upper-left corner of the focus area you want set, and left-
click again on the lower-right corner of the focus area.
A new focus area is now set.
Enable Area: Click to show the check mark to enable
the predetermined focus area and mask over the non-
focus area.
Disable Area: Click to show the check mark to remove
the masking and resume the normal image.
Masking Level: Select the masking level from Level 1
to Level 5. A higher masking level gives a larger
masking density and higher frame rate.
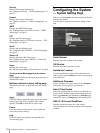
Image Quality
Selects the image quality from Level 0 to Level 9. A
higher level gives a higher quality image but the frame
rate becomes lower.
Capture
When you click Capture, the monitor image freezes and
the “Saving” dialog appears. Type the file name, select
the file format, specify the destination to which the file
is to be stored, and click Save.
This function is the same as when you click the Capture
icon on the image control section. (See “Capturing the
monitor image” on page 10.)
Camera Installation Angle
Rotates the monitor image according to the camera
angle. Select Normal, 90 deg, 180 deg, or 270 deg from
the drop-down list.
Note
The monitor image output from the VIDEO OUT
connector (composite output) cannot be rotated.
Apply/Cancel/Help
See “Buttons common to every setting page” on page
14.
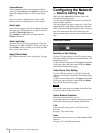
Sending Images via E-
mail at Alarm
— SMTP Setting Page
When you click SMTP in the menu section, the SMTP
Setting page appears.
Use this page to set up for sending monitor images
attached to an E-mail.
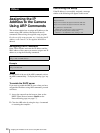
Recipient Email Address
Type a recipient E-mail address in each box. You can set
two E-mail addresses.
Sender Email Address
Type the sender (this unit) E-mail address in the box.
Options
Use Relay-Email-Server
When you want to send E-mails passing through a
specified server, select this check box and type the
server name in the box.
Content-Encoding-Type
Displays Base64, the format with which the image data
attached to E-mails are encoded.
Email Event
Set the trigger with which you send E-mails. You can
select one or more trigger(s) from among Activity
Detection (AD), Sensor Input (SI) and Periodic Sending
(PS).