


26
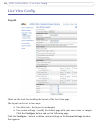
AXIS 231D+/232D+ - Live View Config
Click-in-image
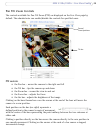
The PTZ device can also be controlled using click-in-image movement, which can also be
of relative or absolute type.
Absolute click-in-image movement means that the camera view
will center on the absolute
position that was clicked.
Relative click-in-image movement means that
by clicking and holding the mouse button
down in the image, the PTZ device moves the camera in that direction, relative to the
center of the image. The further from the center the image is clicked, the greater the
movement.
You can also use Area Zoom to draw a box over a desired area to zoom
in on. Using your
mouse click in the image where you want the center of the area you are going to zoom in
on, and while holding down the left mouse button draw a square over the size of area you
would like to zoom in on.
Focus and Iris Controls
The Focus and Iris (image brightness) can be adjusted manually by using the control bars,
or they can be set for automatic adjustment, by clicking the Auto Iris and Auto Focus
buttons.
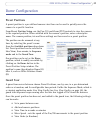
Preset Positions
These presets are selected from the Source drop-down list in the Live View page and will
move and zoom the camera to a pre-defined position, i.e. to cover an area of particular
interest. Events can also be configured to go to preset positions when triggered. For
information on setting up preset positions, please see Dome Configuration,
on page 27 and
the online help.
PTZ Control Queue
This indicates that PTZ queueing has been enabled. This means that the time the user is in
control of the PTZ device is limited and that a user queue has been set up. Use the buttons
to request or release control of the PTZ controls. For information on how to set up the
control queue, please see PTZ Control Queue on page 28 and the online help.
Using CGI links to control PTZ devices
User-defined CGI links on the Live View page can be used to issue HTTP API requests, such
as PTZ commands. These links are configured in the Live View Layout settings, see page
23.