


32 33
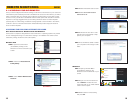
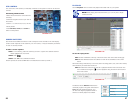
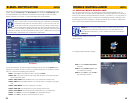
The system can send an email notification with a JPEG snapshot for triggered events on the
system. Selecting Email Setup in the Alarm Setup menu will open the Email Setup menu.
Your DVR will need to be connected to the Internet - either through a router or by being
directly connected to a modem - in order to be able to send out email alerts.
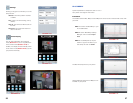
For the example below, we will use Gmail. The settings can be found under Options when
logged into your Gmail account. If you have a corporate mail server, you will need to consult
with your IT department regarding proper settings.
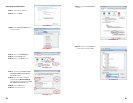
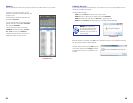
STEP 1. Select ON in the pull-down menu to the right of EMAIL.
STEP 2. SSL Leave SSL turned OFF. SSL deals with encryption. Only advanced users
should enable this option.
STEP 3. SMTP PORT Enter the SMTP port of your email server. Gmail’s is 465.
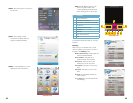
STEP 4. SMTP Enter the SMTP address of your email server. For example, smtp.gmail.
com
STEP 5. SEND EMAIL The “from” address of your alerts.
STEP 6. SEND PW Enter the password of your sending email account
STEP 7. RECV EMAIL Enter the destination email address for your notifications.
STEP 8. Click APPLY and then click CLOSE in the confirmation window.
STEP 9. Click EXIT in all menus until all windows are closed.
NOTE! Depending upon your settings, the system can generate a lot of e-mail
alerts. For that reason, we recommend setting up a dedicated e-mail address
specifically for the system to send alert notices. If you do not have your own
e-mail system (such as a corporate mail server) you should consider using a
free e-mail provider. However, because many free e-mail services allow only a
limited amount of e-mail traffic we specifically recommend using Google’s Gmail service with
its higher limit. Similarly, you will want the alert e-mails to go to a different account than the
one sending them. This will ease your management of these alerts.
PICTURE 3-1
E-MAIL NOTIFICATION
CHAPTER 3
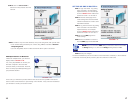
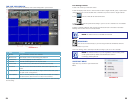
4.1 ENABLING MOBILE SURVEILLANCE
NOTE! Before you can use mobile access you need to setup the network
configuration on the DVR and forward ports 80, 100, and 9000 from the
router the DVR is attached to, to the IP address of the DVR as described in
Chapter 1.
You can access your DVR from your cellular phone running Windows Mobile Pro (6.0 or
later), Symbian (S60 3rd or later), Android, Blackberry (Curve 8900, Bold 9700, Tour 9630), or
iPhone on 3G networks. We have included the software - or the links to it - for your phone on
the disk accompanying your DVR. Instructions for operating the software is included on the
following pages as well as separately on the disk as well. Be sure to check our website from
time to time to see if updated software has been released.
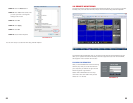
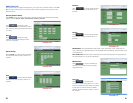
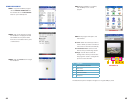
The Mobile Setup window is found in the
Advanced Menu.
To configure mobile notification settings:
STEP 1. Under MOBILE NETWORK,
select 3G
STEP 2. Under MOBILE PORT, enter
your mobile port number.
STEP 3. Click APPLY. Click CLOSE in
the confirmation window.
PICTURE 4-1
PICTURE 4-2
MOBILE SURVEILLANCE
CHAPTER 4