


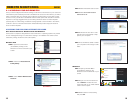

10 11
PICTURE 1-5
1.2 OPENING PORTS
If you wish to access your DVR outside of your local network, you will need to configure your
router to allow data to pass through its firewall using specified ports. This is referred to as
Port Forwarding and does not constitute a security risk for your network as it only allows for
specific communication to and from your DVR. For QS-series DVRs, the three ports that will
be forwarded are; 80, 100 and 9000.
Below are two methods available which will forward ports for the vast majority of users;
UPnP and DMZ. Please be advised that you will only need to use one process or the other to
connect and implementing both will actually cause connection difficulties.
UPNP
UPnP or Universal Plug ‘n’ Play is an industry-standard set of networking protocols which
allows networked devices to instantly locate each other and communicate. Most routers
produced since 2009 feature UPnP. At this time you should consult your router’s manual
to ensure that it features UPnP. As of this writing, 2Wire brand routers DO NOT have UPnP
capability and users of these routers as well as other routers without UPnP functionality will
need to use the DMZ method described immediately below this section to forward their ports.
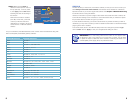
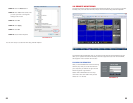
TYPE
MEDIA PORT
WEB PORT
IP ADDR 196.281.941.066
AUTO 075.004.019.001
DHCP
09000
00080
199.210.011.701
DEFAULT
DNS
DDNS SETTINGS UPNP OPEN CLOSE
APPLY EXIT
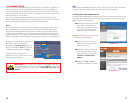
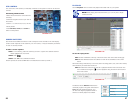
NETWORK SETUP
By default, your DVR comes pre-configured
with UPnP turned on. This setting is
accessible in the Network Setup window. If
UPnP is not selected as Open, you will need
to select that option and then click Apply.
Proceed to the end of this section for
instructions on how to confirm that your ports
are open using an online tool.
IMPORTANT! If you connect your system to your network using UPnP
you should NOT forward your ports as described in DMZ, as it will create
connectivity problems. You may skip to Confirming that Ports are
Opened.
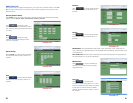
DMZ
DMZ stands for Demilitiarized Zone and is a way to instruct your router to allow data to pass
to and from the ports you specify. Most current models of routers feature DMZ.
Accessing your router’s DMZ controls:
The exact location of DMZ within the router’s settings vary by manufacturer so please consult
your router’s manual for the location of this feature. The method for accessing your router’s
settings, however, is pretty standard.
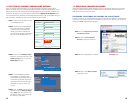
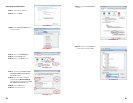
PICTURE 1-6
PICTURE 1-7
STEP 1. Open a web browser and enter
your router’s IP address into the
address bar. This address is listed in
your Router’s manual. This should
open your router’s control panel.
Pictures 1-6 and 1-7 show two examples
of the location of the DMZ controls.
STEP 2. Once you have located the
DMZ controls, ensure that they are
enabled or turned on.
STEP 3. Enter the DVR’s IP address in
the area provided. This is the first
string of numbers you wrote down
in Section 1.1 Obtain an IP
Address.
STEP 4. Click on Apply or Save as
appropriate to preserve your settings.