


12 13
PICTURE 1-8
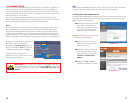
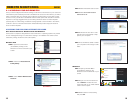
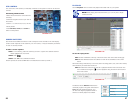
CONFIRMING THAT PORTS ARE OPENED
Whether you used UPnP or DMZ to open your ports, you should confirm that they have
been opened without being blocked by going to www.canyouseeme.org using a computer
connected to the same router as the DVR.
Browser - Windows Internet Explorer
Fine 100%
Open Port Check Tool
Page Safety Tools
hp://canyouseeme.org/
Protected Mode: On
Your IP: 81.919.622.24
What Port?
CanYouSeeMe.org - Open Port Check Tool
Check
This page will serve as a free utility for remotely verifying a port is open or closed. It will
be useful for users who wish to check to see if a server or ISP is blocking certain ports.
Success: I can see your service on
81.919.622.24 on port (80)
Your ISP is not blocking port 80
STEP 1. Enter “80” into the box labeled
“What Port?”
STEP 2. Click on the Check button
STEP 3. You should see a green
“Success” message.
If you get a red error message, you will need
to return to the DVR’s Network Settings
page and change the Web Port to 81, 83
or 85 and click Apply to save your changes.
The DVR will need to reboot to use the new
settings. You can then reattempt the check
by entering that new number in the Port field.
STEP 4. Repeat for ports 100 and 9000. If ports 100 and 9000 are blocked, then use a
number in that range (ie; 110, 9100, etc.)
This website will also display your Public IP address near the top of the page above the box
where you entered your port number. This is the number which you will use to access the DVR
using a web browser or your mobile device from outside of your local network (away from
the building in which your DVR is located). Please note that if you had to use a different port
number than 80 for the web port, you will have to add a colon (:) and that port number to the
end of the address shown. Example 82.919.622.24:81.
PICTURE 1-9
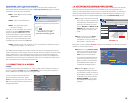
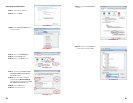
1.3 CONNECTING VIA A MODEM
PPPOE
If you are going to attach the DVR directly to a DSL or Cable modem instead of a router you
will want to select the PPPOE option in the NETWORK options. This method is instead of
UPnP or DMZ and only applies if you are not using a router.
Contact your ISP for the User Name and
Password needed for the router. Select
PPOE from the Type pull-down menu and hit
OK. Enter the User Name and Password into
the appropriate fields.
Browser - Windows Internet Explorer
Fine 100%
Router
Page Safety Tools
hp://81.919.622.24
Protected Mode: On
SETTINGS
ADVANCED
STATUS
DEVICE INFORMATION
All of your Internet and network connecon details are displayed on this page.
WAN
MAC Address :
IP Address :
Subnet Mask :
Default Gateway :
Primary DNS Server :
Secondary DNS Server :
Advanced DNS :
00:24:01:77:f9:00
81.919.622.249
255.255.255.0
81.919.622.24
10.6.196.6
(null)
Disabled
DEVICE INFO
LOGS
STATISTICS
INTERNET SESSIONS
ROUTING
WIRELESS
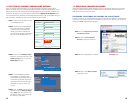
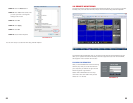
1.4 ACTIVATING DNS (DOMAIN NAME SERVER)
Once you have completed the previous sections, you are able to operate your DVR remotely.
However, in order to activate features such as the ability to send e-mail alerts from your
system as well as being able to access it using a conventional web address, you will need to
obtain the DNS (Domain Name Server) number. You will be obtaining this number from your
router and entering it into the appropriate field within your DVR’s Network Setup window.
STEP 1. Open a web browser and enter
your router’s IP gateway address into
the address bar. This address is the
second set of numbers you wrote
down in Section 1.1 Obtain an IP
Address and it ends with 001. This
should open your router’s control
panel.
STEP 2. Locate your router’s Status
window (it may also be named
“Information” or “Info”), it will list the
DNS number – copy this down.
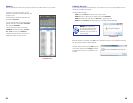
Each brand of router is different. Picture 1-10 shows an example of the location of the DNS
number in a router’s status window.
PICTURE 1-10
PICTURE 1-11
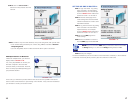
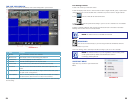
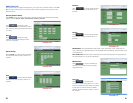
STEP 3. Return to the Network Setup
window in your DVR and enter the
DNS number into the field marked
DNS using the Virtual Keyboard.
In cases where the DNS number on
your router only shows one or two
digits in a section you should enter
zeroes BEFORE the number(s) to
complete the three-digit section.
STEP 4. Click Apply to save your
changes before exiting the window.
You will need to restart your DVR for
the changes to take effect. If you are
continuing on with the next section,
Setting up DDNS, you can wait
until making those settings before
restarting.
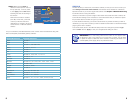
TYPE
MEDIA PORT
WEB PORT
IP ADDR 196.281.941.066
AUTO 075.004.019.001
DHCP
09000
00080
010 .006.196 .006
DEFAULT
DNS
DDNS SETTINGS UPNP OPEN CLOSE
APPLY EXIT
NETWORK SETUP