


2-6
Using EPSON Photo!3
L
Proof Sign-off:
BLE H.Kato E.Omori
F.Fujimori
SEI M.Kauppi
R4C4410
Rev. C
A5 size PHT3.FM
2/14/00 Pass 3
If you still cannot open the Camera menu, see “Using
the Setup Menu” on page 2-19 to establish a proper
connection.
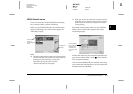
Camera menu
Displays small thumbnail images of all the photos
stored in the memory card in the camera. You can
transfer any image to the computer or erase it from the
memory card.
Folder menu
Displays thumbnail images of photos that have been
saved to a folder on your hard disk. Select images to
transfer them to an application, or erase them from the
folder. You can also upload these images from your
computer to your camera’s memory card.
Controls menu
Displays camera settings such as image quality and
flash control. You can change some of the camera
settings, and also take pictures using the Live Preview
window on your computer.
Note:
To take a picture or use the Live Preview feature, make sure
to turn the dial switch to or before accessing EPSON
Photo!3. If your camera is the PhotoPC 800, open the lens
cover.
Setup menu
Displays the current status of communication
between your camera and the computer. You can
change the communication settings if needed, and also
set the camera’s internal time and date.
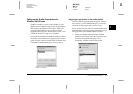
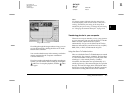
Using the Camera Menu
When you open EPSON Photo!3, the Camera menu
appears and starts downloading thumbnail images of
the photos stored in the memory card in the camera.
The images are downloaded in the order that they
were taken and are displayed in the image selection
window.