


Abgleichvorschriften / Adjustment Procedures GV44…, GV45…, GV46…
3 - 6 GRUNDIG Service-Technik
2.2 Family Board – DOS (OS)
Test Equipment: Two-channel Oscilloscope, 1:1 Test Probe (TK).
Service work after replacing the Family Board: –
Adjustment Preparation Adjustment Procedure
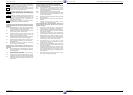
1. H/2 Sync
Adjustment, F1040
(necessary after
replacing F1040 or
C2167)
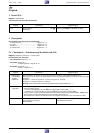
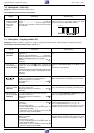
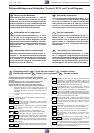
Set the time interval with F1040 between the middle of the
H/2-SYNC (IC7190-(7)) pulse and the negative going edge
of the SYNC (IC7190-(10)) to ∆t = 32µs ±10µs.
64µs ∆t
IC7190-(7)
IC7190-(10)
Oscilloscope:
Channel 1: ....................................................IC7190-(10)
Channel 2: ......................................................IC7190-(7)
Trigger: ....................... Channel 2, negative going edge.
Feed in a HF signal (PAL) / Record or EE mode without
Texttable.
2.3 Family Board – Frontend (FE)
Test Equipment: Oscilloscope (>50MHz), 10:1 Test Probe, Voltmeter, Colour Generator with Stereo Coder, Distortion Factor Meter, Stabilized Power
Supply.
Service work after replacing the Tuner: Adjustment no. 2
Adjustment Preparation Adjustment Procedure
1. Vision Demodula-
tor Circuit, F1175
(AFC-ADJ)
2. Delayed AGC
Voltage, R4140
(AGC-ADJ)
3. Quasi-Split-Sound
(QSS), F1145
(REF-ADJ)
4. FM-Demodulator
(FM-Sound 1),
F1155 (FM1-ADJ)
5. FM-Demodulator
(FM-Sound 2),
F1180 (FM2-ADJ)
6. Cross Talk
7. ATS-Adjustment
Set the voltage with F1175 (AFC-ADJ) to 2.5V ± 0.1V.
Set the amplitude with R4140 (AGC-ADJ) to 40mV
PP
.
Unsolder the 4.7pF capacitor.
Set the distortion with F1145 (REF-ADJ) to Minimum
(or adjust for best sine wave possible on the oscilloscope).
Set the distortion with F1155 (FM1-ADJ) to Minimum
(or adjust for best sine wave possible on the oscilloscope).
Set the distortion with F1180 (FM2-ADJ) to Minimum
(or adjust for best sine wave possible).
Set the cross talk to Minimum:
Coarse: with remote control button 1 = "
L †
", 2 = "
L --
"
Fine: with remote control button 3 = "
S †
", 4 = "
S --
"
To cancel the service function: Press the "Standby" button
or disconnect the recorder from the mains.
Press the button 7. The display shows "
ATS† 00 00 A7
".
To cancel the service function: Press the "Standby" button
or disconnect the recorder from the mains.
Initializing the RAM and EEPROM (2.1 Sequence Control
/Deck Electronic – Adjustment no. 1)
Power Supply, 2.3V (AFC disabled): ...........IC7050-(24)
Feed in a TV standard test pattern (Ch12, Ch21, Ch68, Ch8
or Ch60; see "Initializing the RAM and EEPROM").
Voltmeter: ........................................................... MP
86
EE mode.
Solder a 4.7pF capacitor to MP
87
. Connect the oscilloscope
with 10:1 test probe to the free connection of the capacitor.
Feed in a standard test pattern without audio modulation (UHF-
range, Ch26, 67dBµV aerial signal) into a warmed-up set.
EE mode
Feed in a standard test pattern (UHF-range, Ch26, aerial
signal >60dBµV ) into a warmed-up set.
Distortion factor meter (or oscilloscope)
with 10:1 test probe: ........................................... MP
82
EE mode
Feed in a 2-channel sound standard test pattern with the
colour generator, 1kHz sine, ±27kHz deviation.
Distortion factor meter (or oscilloscope): ........... MP
82
EE mode.
Feed in a 2-channel sound standard test pattern with the
colour generator, 1kHz sine, ±27kHz deviation.
Distortion factor meter (or oscilloscope): ........... MP
83
EE mode.
Feed in a standard test pattern with sound modulation
"stereo".
Oscilloscope: ...................................................... MP
82
RF recording.
Call up the service function:
– Press the Z button on the remote control handset
("
CODE – – – –
" is indicated in the display).
– Enter the code number 4 9 3 4 and press the O
button ("
SERV
" is indicated in the display).
Feed in a standard test pattern (UHF-range, Ch26, 50dBµV
aerial signal).
RF recording.
Call up the service function:
– Press the Z button on the remote control handset
("
CODE – – – –
" is indicated in the display).
– Enter the code number 4 9 3 4 and press the O
button ("
SERV
" is indicated in the display).