


28
Note
If you still see spots on your shots after you have cleaned the outside of the infrared
filter, then you may have dust either on the inside of the IR filter or on the sensor itself.
However,
never attempt to remove the glass filter – you will probably ruin the sensor if you
do so!
If dust manages to get between the IR filter and sensor, it can only be removed at the Has-
selblad factory. Contact your Hasselblad dealer or Hasselblad Service Center for assistance.
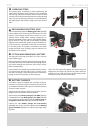
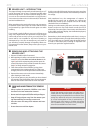
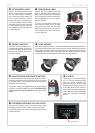
CLEANING THE SENSOR FILTER
If you see dark or colored spots or lines in your images, then you may need to clean
the outer surface of the sensor unit’s infrared (IR) filter. In most cases, the careful
use of compressed air will be adequate though if you use canned compressed air,
read the instructions very carefully before use to avoid spraying impurities or even
ice on the filter! Sometimes, however, small particles will get stuck to the surface of
the IR filter, requiring for a more thorough cleaning, involving either fluid or wipes.
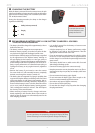
1. If compressed air did not remove all the problems on the filter, then use an
E-wipe.
2. Tear at the notch to break seal. Remove E-wipe from its packaging and fold
the tissue to match the width of the IR filter.
3. Apply firm pressure using two or three fingers at the edge of the wipe to ensure
an even, firm contact with filter surface. Wipe the surface in one unbroken
motion.
4. Finally check if the IR filter has been properly cleaned either by visual inspec-
tion or by mounting the sensor unit to the camera and making a test capture.
If further cleaning is needed, repeat cleaning procedure.
Note
Do not use same side of the e-
wipe twice as you will be likely
to re apply any particles re-
moved in the first pass.
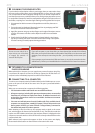
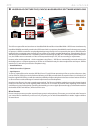
TETHERED TO A COMPUTER WITH
PHOCUS RUNNING
When tethered to a computer, you can control many camera functions using Pho-
cus software. All captures are saved as 3F files (as opposed to 3FR files from a CF
card) and can be immediately exported to other formats if desired.
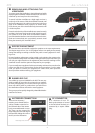
CONNECTING TO A COMPUTER
To connect to a computer, attach a FireWire cable from the FireWire port on a com-
puter to the port on the side of the sensor unit. The port is protected behind a
hinged cover.
When you are connected to a computer, the following applies:
• The destination medium and location are controlled from Phocus.
• All exposure settings, including ISO, aperture and exposure time, are controlled
from Phocus if you choose to expose from Phocus. In addition extra tools such
as Live Video, remote focus control etc are available. See Phocus user manual
for full description.
• The sensor unit will take power from the FireWire cable if it is available (not all
computers can supply power, notably PC laptops). This will help conserve the
battery power. However, you must still have a charged battery connected as
the camera body needs it in order to operate.
When initiating a shot from Phocus, the computer sends a signal to the sensor
unit, which triggers the shutter (and strobe/flash, if any). The back then sends the
capture over the FireWire connection to the computer, where it is displayed on the
computer screen and saved as a 16-bit 3F file in the currently selected folder on the
computer hard disk.
When tethered, each capture also appears as ‘Host’ on the sensor unit display.
Please note that the buttons on the unit have no function in this mode.
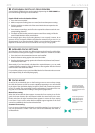
‘Camera’ tool in Phocus.