


71
12. SETUP MENU
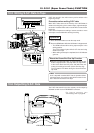
LIGHT
ON
OFF
COUNTER
CTL
TC
UB
RESET
OPERATE/WARNING
MONITOR
SELECT
STATUSSHUTTER
MENU
FILTER
1 3200k
2 5600k
3 5600k+ND
POWER
NG
GAIN
OUTPUT
WHT.BAL
VTR
ON OFF
ALARM
MONITOR
SAVE STBY
H M L
BARS CAM
AUTO KNEE
PRST A B
ON
OFF
CH-1
CH-2
AUDIO
LEVEL
AUTO IRIS LOLUX
BACK L
NORMAL
SPOT L
STRETCH
NORMAL
COMPRESS
FULL AUTO BLACK
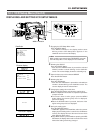
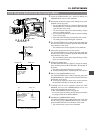
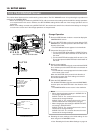
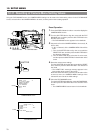
SHUTTER dial
STATUS button
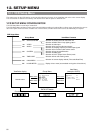
2. 3. 4. 5. 6. 8.
1.
Press the STATUS button for 1 second to display the
CAMERA MENU screen in the viewfinder.
2.
Choose the file with the camera menu settings to be used.
(SCENE FILE A, B or OFF)
1 Turn the SHUTTER dial up or down to align the cursor
with SCENE FILE, and then press the SHUTTER dial
in the direction of the arrow.
• The area with the setting value starts blinking, and the
value can now be changed.
2 Turn the SHUTTER dial up or down to select the setting
value. (A, B or OFF)
3 Press the SHUTTER dial in the direction of the arrow.
• The setting value stops blinking but remains lit.
3.
Turn the SHUTTER dial up or down to align the cursor with
the menu item to be set, and then press the SHUTTER dial
in the direction of the arrow.
• The selected menu screen appears in the viewfinder.
4.
Choose the menu item from the menu screen.
Turn the SHUTTER dial up or down to align the cursor with
the menu item to be set, and then press the SHUTTER dial
in the direction of the arrow.
• The area with the setting value starts blinking, and the
value can now be changed.
5.
Change the setting value.
Turn the SHUTTER dial up or down to change the setting
value, and then press the SHUTTER dial in the direction of
the arrow.
• The setting value stops blinking but remains lit.
Ⅲ To change multiple items, repeat steps
4.
and
5.
above.
6.
Return to the CAMERA MENU screen.
Turn the SHUTTER dial up or down to align the cursor with
the PAGE BACK item, and then press the SHUTTER dial in
the direction of the arrow.
Ⅲ To change the settings of other menu screens, perform
the operations described in steps
3.
to
6.
above.
7.
If SCENE FILE A or B is selected, choose the FILE
MANAGE item from the CAMERA MENU screen and
perform the operations for storing a file.
☞ See "FILE MANAGE Screen" on page 76.
* It is not necessary to perform the file storage operations
for changes made to the SETUP MENU.
8.
Complete the CAMERA MENU setting.
Turn the SHUTTER dial up or down to align the cursor with
the EXIT item on the CAMERA MENU screen, and then
press the SHUTTER dial in the direction of the arrow.
• The normal screen returns in the viewfinder.
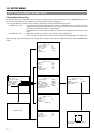
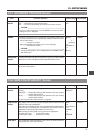
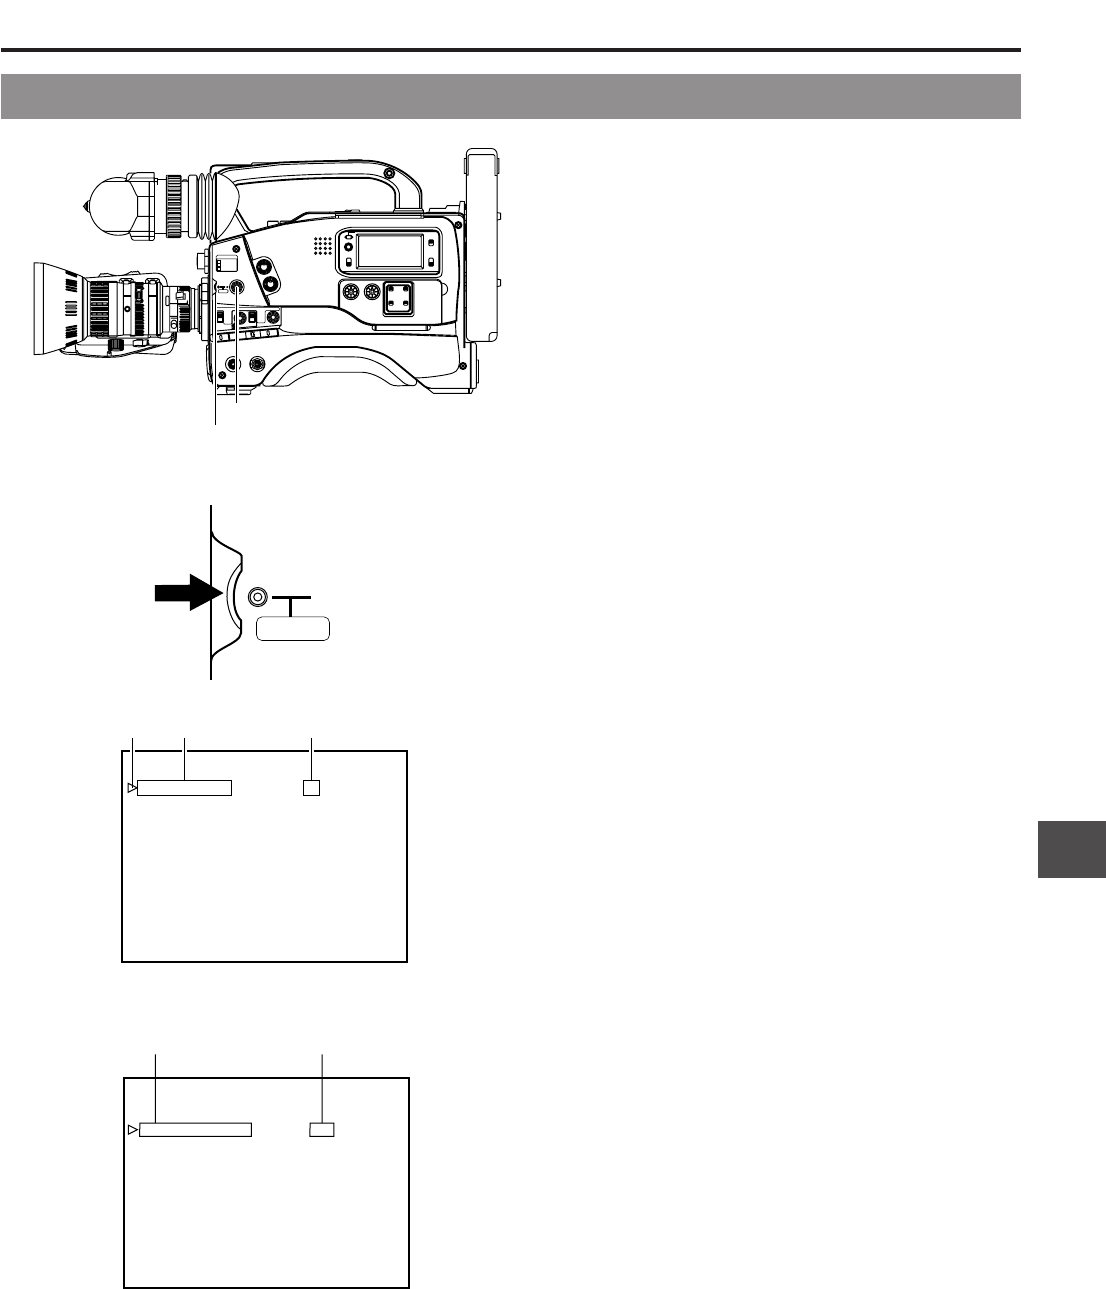
--- - - CAMERA MENU -
SCEN FI LE :A
VF DISPLAY MENU
OPERAT I ON MENU
PROCESS MENU
FILE STORE
SETUP MENU
EXIT
CURSOR Item Setting value
E
CAMERA MENU screen
12-3 How to Select from the Camera Menu
SHUTTER
MENU
--- VF DISPLAY ---
SCENE F ILE A
F.NO DISPLAY
DISPLAY
:ON
:ON
:OFF
-80%
AUDIO
SAFETY ZONE
REC TIME : REMAI N
ZEBRA : 70
PAGE BACK
Item
Setting value
VF DISPLAY MENU screen