E-34
Setting Up the Camera Using an RM-P2580
AUTO PAN Setup
Use the AUTO PAN screen to set the auto pan function, which allows the camera to be revolved slowly in a horizontal direction)
The auto pan function has three modes, the RETURN mode for continual movement between two positions, the RIGHT mode for
clock-wise rotation and the LEFT mode for counterclockwise rotation.
1.
Select the camera. (
☞
RM-P2580 Instruction manual)
CAMERA button → Numeric key (camera number) → ENTER button.
The picture of the selected camera is output.
2.
Display the SETUP menu on the camera.
(
☞
P. 18, steps
1
to
4
)
MENU button (3 sec.) → Select “CAMERA” with the PAN/TILT lever
→ SET button.
The camera moves to the home position.
3.
Tilt the PAN/TILT lever up or down to move the cur-
sor (>) to “AUTO PAN/PATROL TRACE” and press
the SET button.
The AUTO PAN/PATROL/TRACE menu is displayed.
4.
Set the auto pan mode and speed.
• Select the “AUTO PAN MODE” item and then select either RE-
TURN (continual movement between two positions),
RIGHT(clockwise rotation) or LEFT (counterclockwise rotation).
• Select the “AUTO PAN SPEED” item and then select either LOW,
NORMAL or HIGH.
5.
Move the cursor (>) to “A. PAN START POSITION
SET” and press the SET button.
The START POSITION SET screen is displayed.
6.
Adjust the viewing angle of the start position.
• Use the PAN/TILT lever, FOCUS button and ZOOM button to ad-
just the viewing angle.
• Tilting of the camera and changes in lens controls such as the
FOCUS and ZOOM settings are not available at the return posi-
tion.
7.
Press the MENU button.
The AUTO PAN/PATROL/TRACE screen shows “DATA SAVED” to
indicate that the viewing angle for the start position has been regis-
tered.
8.
Move the cursor (>) to “A. PAN RETURN POSITION
SET” and press the SET button. (RETURN mode only)
The RETURN POSITION SET screen is displayed.
9.
Adjust the viewing angle of the return position.
(RETURN mode only)
Pan the camera in the right and left directions and adjust the view-
ing angle.
10.
Press the MENU button.
• The screen returns to the previous menu.
After the above setup, auto panning of the camera can be started by
pressing the AUTO PAN button on the RM-P2580.
☞
“Auto Panning” in the RM-P2580 Instruction manual.
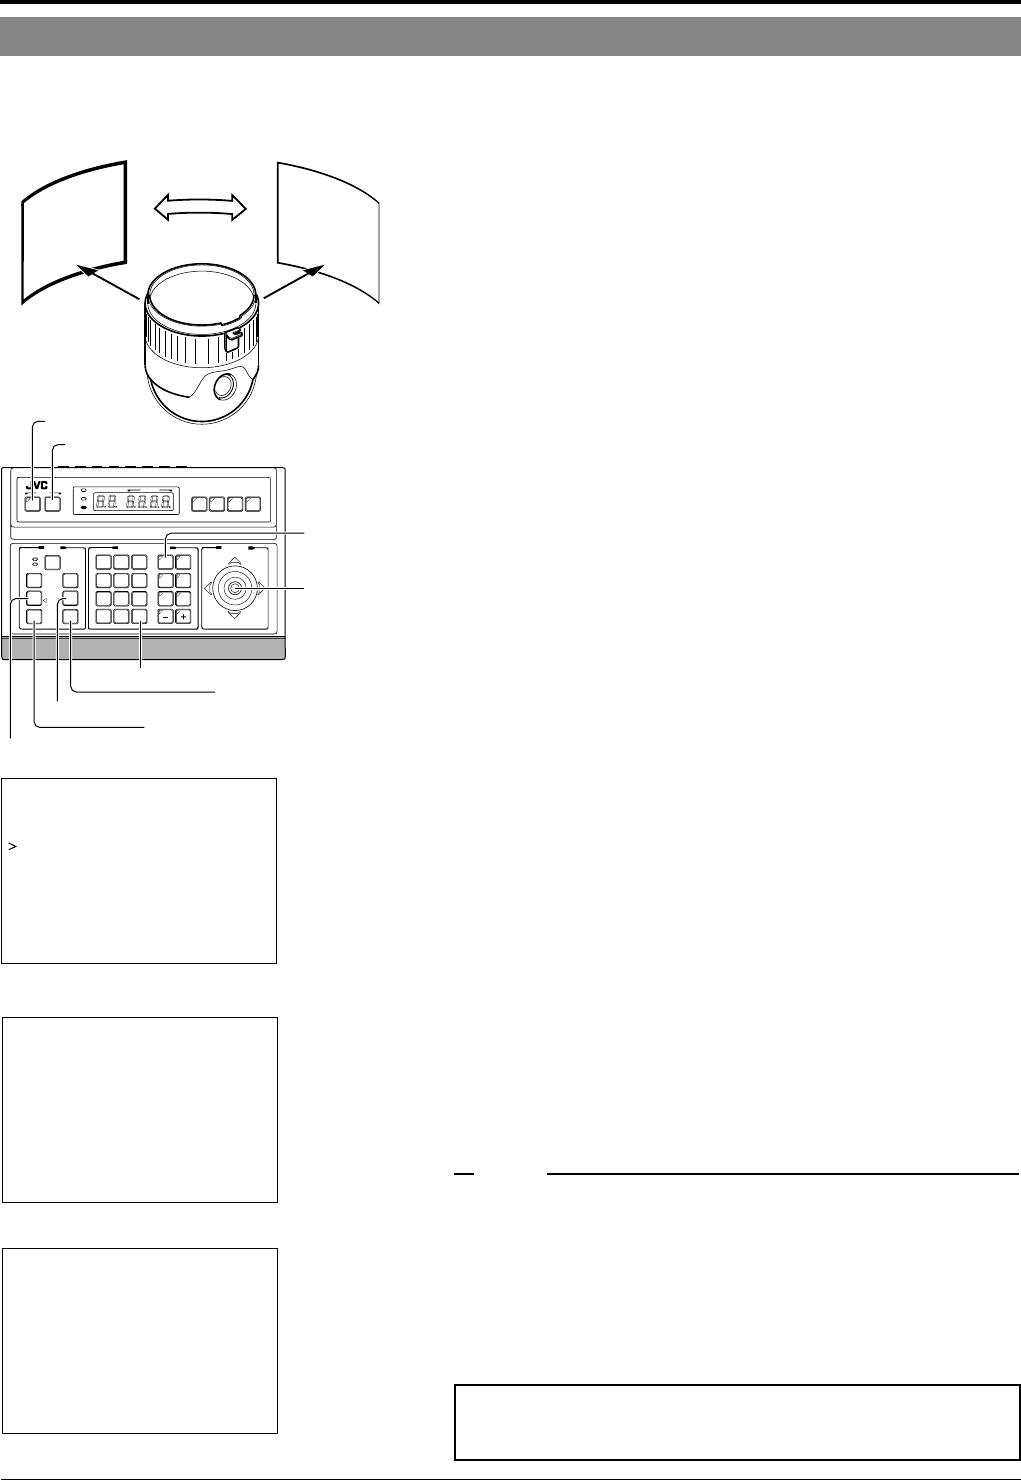
Slow movement
Picture of
start position
Picture of
return position
SETUP
MENU SET
SPEED
IRIS
AF
FOCUS
ZOOM
OPEN
FAR
TELE CLEAR
/HOME
7
4
1
8
0
5
2
9
6
3
ENTER
AUTO
PAN
OPTION
1
OPTION
2
CAMERA
POSI-
TION
AUTO
PATROL
CLOSE
NEAR
WIDE
AUTO F-1 F-2 F-3
PAN/TILTLENS
CAMERA/POSITION
CAMERA POSITION
REMOTE CONTROL UNIT
RM-P2580
ALARM
POWER
KEY LOCK
PAN/TILT
lever
CAMERA
buttons
WIDE button
FAR button
TELE button
NEAR button
ENTER button
SET button
MENU button
AUTO PAN/PATROL/TRACE menu
AUTO PAN MODE RETURN
–––AUTO PAN/PATROL /TRACE–––
AUTO PAN SPEED NORMAL
A.PAN START POS.SET..
A.PAN RETURN POS.SET..
AUTO PATROL SET. .
AUTO TRACE SET. .
RM A.PAN KEY A.PAN
RM A.PATROL KEY A.PATROL
START POSITION SET screen
–––START POSITION SET–––
PUSH MENU
/
SAVE&RETURN
/
RETURN POSITION SET screen
–––RETURN POSITION SET–––
NRUTER&EVAS
/
UNEMHSUP
• It is not possible to tilt the camera or change the lens settings at
the return position.
• If the SET or MENU buttons are pressed while the camera is mov-
ing, the correct settings cannot be registered. Make sure that the
camera is stationary before pressing the SET or MENU buttons.
MEMO


