


E-7
ENGLISH
)
⁄
(
*
^
&
(Setting switch side)
$
%
#
#
@
!
0
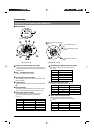
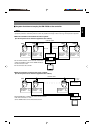
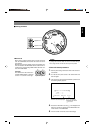
Cover
For protection against water drips. Slit the rubber cap on
this cover and pass the cable through the slits.
☞
P. 14
!
Camera Connector (Female)
Connect to
^
, the Male Connector on the camera.
@
Drop Prevention Hook
Attach the Drop Prevention Wire
&
to this hook to prevent
the camera from falling.
#
Clamping Holes (x 4)
Attach the camera to a ceiling or to a Ceiling Flush Mount
Bracket (optionally available) using these holes.
$
[MACHINE ID] Switch
When an RS-485 communication system is used, for ex-
ample when using the camera in a system controlled by
an RM-P2580, set the camera IDs individually for each
camera.
☞
P. 13
%
Setting Switches
Use these to set the PROTOCOL, etc.
☞
P. 12
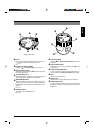
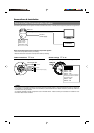
^
Connector (Male)
Connect to
!
, the Female Camera Connector on the Ceil-
ing Mount.
&
Drop Prevention Wire
Attach this wire to the Drop Prevention Hook
@
on the
Ceiling Mount.
*
Camera Clamping Bracket
In order to clamp the camera onto the Ceiling Mount, in-
sert and tighten the Locking Screw
4
into this bracket.
(
Lens
The lens cannot be replaced.
)
Dome Cover
The dome cover is fragile. Take care when handling it.
⁄
Camera Body Cover
Do not remove the camera body cover while the camera is
installed on a ceiling. Doing so will cause the dome cover
to fall down.