


E-40
Other
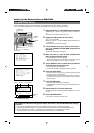
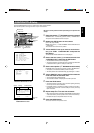
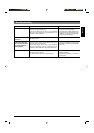
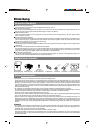
Removing a Ceiling Flush Mount Bracket (Optional WB-S575)
Push the stopper release lever
upwards with a screwdriver, etc.
Release
label
*
Stoppers
Clamping
bracket
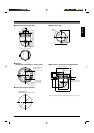
3.
4.
5.
6.
<Check the release labels thoroughly before removal.>
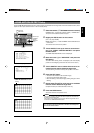
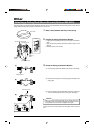
1.
Remove the ceiling panel.
Pull the ceiling panel and disengage the two hooks.
2.
Remove the camera.
Remove the camera from the Ceiling Mount by reversing the at-
taching procedure.
☞
P. 16, “Attaching the Camera”
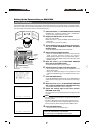
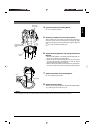
3.
Loosen the clamping screws of the Ceiling Flush
Mount Bracket.
• Loosen the three clamping screws (by turning them counterclock-
wise).
• Make sure that the clamping brackets move inwards.
4.
Lower the Ceiling Flush Mount Bracket until the
stoppers contact the ceiling plate.
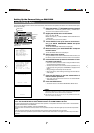
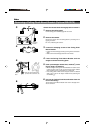
5.
Push up the stopper release lever, marked (
*
) in the
figure, using a screwdriver.
• While holding the Ceiling Flush Mount Bracket from below so that
it does not drop, push up the one of the three stopper release
levers marked (
*
)using a screwdriver or a similar tool.
• If the ceiling plate is thick and the stoppers cannot be released
easily, push up two of the stopper release levers (including the
one marked (
*
)).
6.
Pull out the Ceiling Flush Mount Bracket from the
hole in the ceiling.
Tilt the Ceiling Flush Mount Bracket and move it obliquely down-
ward to remove it.