


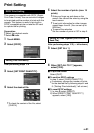

54
EN
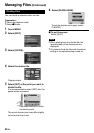
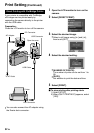
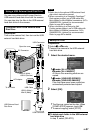
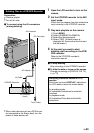
Connection with a BD/DVD Burner
Preparation:
Turn on the camera first, then turn on the
BD/DVD burner.
DC Connector
USB Connector
AC Adapter
To AC Outlet
USB Cable
BD/DVD Burner
USB Connector
Open the cover
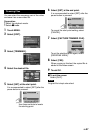
•
You can also connect the cables using the
Everio dock connectors.
NOTE
•
Refer also to the optional BD/DVD burner’s
instruction manual.
•
When connecting to a DVD burner, use the USB
cable that came with the DVD burner.
•
When connecting to a BD burner, use a
USB cable with Mini-A(Male) to B(Male)
connectors. JVC’s QAM0852-001 (optional) is
recommended. Refer to page 64 for details.
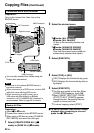
Backup All Files
Preparation:
•
Select ! or # mode.
•
Connect the camera to the BD/DVD burner.
•
When using a BD burner, select [CHANGE
REC. MEDIA] and select the disc type.
1 Select [CREATE FROM ALL] (!
mode) or [SAVE ALL] (# mode).
2 Select the desired menu.
•
! mode: [ALL SCENES]
# mode: [ALL IMAGES]
All files in the recording medium are
copied.
•
! mode: [UNSAVED SCENES]
# mode: [UNSAVED IMAGES]
Files that have never been copied are
automatically selected and copied.
3 Select [EXECUTE].
4 Select [YES] or [NO].
•
[YES]: Displays the thumbnails by group.
•
[NO]: Displays the thumbnails by date or
by playlist.
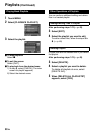
5 Select [EXECUTE].
•
The files are copied on the disc. When
[COMPLETED] appears, touch OK.
•
When [INSERT NEXT DISC PRESS
[STOP] TO EXIT CREATE] appears,
change the disc. Remaining files are
copied on the second disc.
•
To cancel copying, select [STOP].
To switch between video and still image
playback after connecting to a burner,
press the ! / # button.
Copying Files (Continued)