Shooting
53
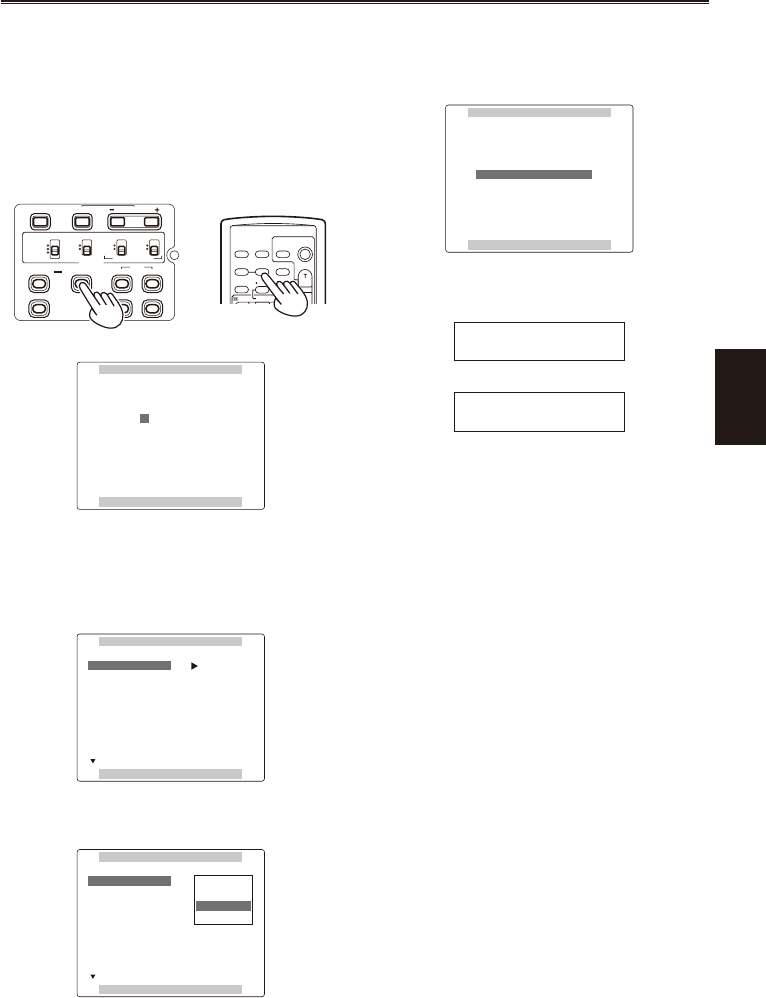
6 When the screen shown below appears,
use the Operation lever to enter a 6-
character le name.
Set the same as user information. (Page 60)
Characters that can be set
Space, A to Z, 0 to 9, : ; < = > ? @ [ \ ] ^_-./
When the lename has been set, you can
erase all characters using the RESET button
on the camera or the remote control.
Camera or Remote control
BARS
CH1 SELECT
RESET/TC SET
REC
CH2 SELECT
AUDIO
INT(L)
INPUT1
INPUT2
SHUTTER
SPEES SELECT
INT(R)
INPUT2
INPUT1
MIC POWER+48V
ON
OFF
INPUT2
ON
OFF
LCD
ZEBRA
EVF DTL
OIS
WFM
OSD
COUNTER
RESET TITLE
VOL +
MULTI/
P-IN-P
REC A.DUB
PLAY/REW FF/
ZOOM
DATE/
TIME
PHOTO
SHOT
START/
STOP
-
COUNTER
NAME EDIT
PUSH MENU TO RETURN
SW POSITION F1
+/– : PUSH q / g
SEL : PUSH t / y
7 After you nish setting the lename, press
the MENU button.
8 Push the Operation lever in the
r
direction
to select LOAD/SAVE/INIT.
SCENE FILE F1:
PUSH MENU TO RETURN
LOAD/SAVE/INIT ––––
VIDEO CAM
DEFAULT
1/48.0
0
0
0
0
OPERATION TYPE
V DETAIL LEVEL
DETAIL CORING
FRAME RATE
SYNCRO SCAN
DETAIL LEVEL
CHROMA LEVEL
9 Press the Operation lever, push it in the
r
direction to select SAVE and press it again.
SCENE FILE F1:
PUSH MENU TO RETURN
LOAD/SAVE/INIT ––––
LOAD
SAVE
INITIAL
0
0
0
0
OPERATION TYPE
V DETAIL LEVEL
DETAIL CORING
FRAME RATE
SYNCRO SCAN
DETAIL LEVEL
CHROMA LEVEL
•
10 Press the Operation lever to select YES
when the screen shown below appears.
(To return to the menu level above, press the
MENU button.)
SCENE FILE F1:
PUSH MENU TO RETURN
SAVE?
YES –––
PUSH STILL
NO
The message below appears, and the changes to
the scene le are complete.
SAVE
PROCESSING...
SAVE
COMPLETED !
11 Press MENU twice to exit the menus.
To return to a previously saved setting after a
change in scene le settings, select LOAD in step
9 and do steps 10 and 11.
To return the scene le settings to the factory
settings, select INITIAL in step 9, then do steps
10 to 11.
•
•


