


MAJOR
OPERATING
CONTROLS
AND THEIR
FUNCTIONS
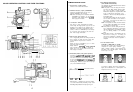
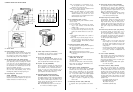
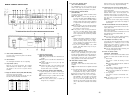
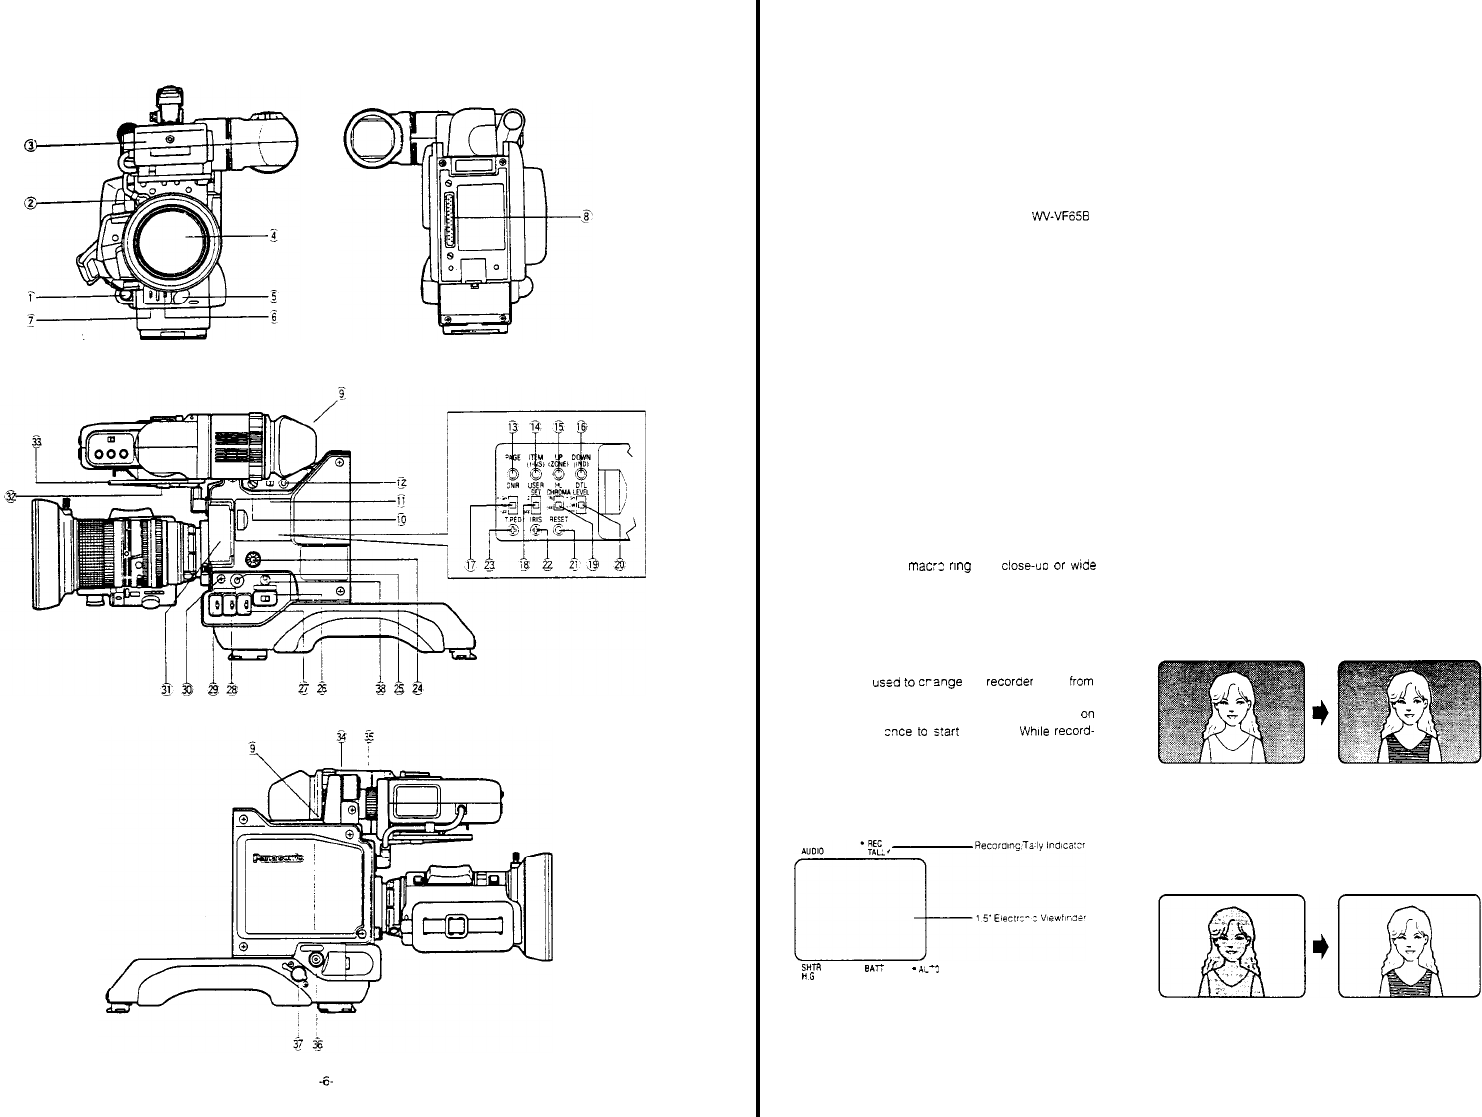
CAMERA HEAD AW-F575HE
1. Lens
Connector
(12-pin)
(LENS)
Connect
the
lens
cable t
o
this
connector
2. Viewfinder
Connector
(12-pin)
(VIEWFINDER)
Connect
th
e
viewfinder
cable from the
15’
or
5’
Electronic
Viewfinder
to
this
connector
Note:
When
connecting
the
5"
Electronic
Viewfinder
VW-VF65B
to
this
connector,
use the
Viewfinder
Conversion
Cable
supplied
with
the
Refer t
o
page 28 for details.
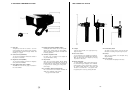
3. 1.5”
Electronic
Viewfinder
This
small
1.5
"
(1-3/8"
actual
image
size)
monitor
shows
exactly
the
image
picked
up
by
the
lens.
The
viewfinder
can be
titled
30º from
horizontal
and
it
is
adjustable
up
and
down
by
approximately
20 mm.
(13/16").
Further
the
viewfinder
may be
slid
laterally
by
up
to
45
mm (1-
3/4")
a
nd
20 mm
(3/4")
back
and
forth.
Refer
to
p
age
18 for
details.
4. Auto Iris
Serfvo
Control Zoom
Lens
Thls
is
a
high-quality
zoom
lens
offering
automatic
as
well
as manual
iris
control
and
servo
control
zoom
The
lens
features
a bayonet mount F1.4 Maximun
Fl
maxlmurr
aperture
Picture
size
may
be
magnified
by
up
to
14
times
through
use
of
the
zoom
feature.
Simply
rotate
the
mac:z
nng
for
close-uo
or
wde
angle
recording. M
acro
shooting
is
po
ssible
of
objects
up
to
5
cm
(15/16")
from the
lens
surface
Refer
to
page
16
for
details .
5.
VTR
Start/Stop
Button
(VTR)
(parallel
operation)
This
button
is
used
fo
crsnge
the
recorder
mode
frOm
pause
(Recording
Pause)
to
recording
and
functions
in
the
same
way as the
VTR
Start/Stop
Button
(92)
on
the
lens.
Press
zxe
to
s!art
recording.
Whlle
record-
ing,
the
Tally
Indicator
in
the
viewfinder
and the
Recording/Tally
indicator
(9)
light,
and
the
Tally
Light
(101)
on
the
viewfinder
al
so
lights.
.
.
When this button
is
pressed
once more
the
recorder
is
set
to
the
Pause
mode
(Recording
Pause)
and
the
Recording/Tally
Indicator
and
Tally
Light
will
go off.
- 7 -
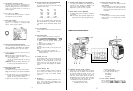
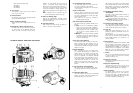
6. Auto
White/Auto
Black Set Switch
(AUTO
W/B
BAL
AWC/HOLD/ABC)
This
switch
sets
the
white
balance
and black balance
automatically
as
follows
AWC:
This
position
is
used
for
setting
the
white
bal-
ance when
the
White
Balance
Selection
Switch
(28)
is
set
to
the AWC A
or
AWC B
position
White
balance
adjustment
is
requiered
when ‘AWC
A NG’
or
‘AWC
B
NG’
starts
blinking
in
the
viewfinder
or
when the Auto
Warning
Indicator
in
the
viewfinder
lights
Two
white
balance
settings
for
two
light
sources,
such
as
indoor
and
outdoor
can be
retained
in
the
memory. I
n
this
case
both
the
AWC A and
AWC B
positions
are
used
HOLD:
In
this
position,
the
white
and black balances
set at the AWC
or
ABC
position
can be
held
fixed
if so
desired
for at
least
one
year.
ABC:
This
position
is
used
for
setting
the black bal-
ance.
Black balance
adjustment
is
required
when
‘ABC NG’
starts
blinking
in
the
viewfinder
or
when
the Auto
Warning
Indicator
in
the
viewfinder
lights
Note: The
picture
will
flash
in
the
viewfinder
while
the
black
balance
is
being
set.
This
flashing
indi-
cates that the
adjustment
is
currently
being
per-
formed and
will
cease
once
the
adjustment
is
completed.
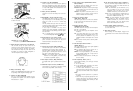
7.
Lens
Iris
Selection
Switch
(LENS
IRIS:
1/2
OPEN / NOR / 1/2
CLOSE)
This
switch can be
used
to
set
the
lens
iris
opening
to
compensate for
unusual
lighting
conditions
if
the
object
is
brightly
lit
against
a
dark
background, set
this
switch
to
the
1/2
CLOSE
position.
This
will
close
the
lens
iris
by
a
1/2
F
stop
If
the
object
is
relatively
dark and
the
background
is
bright,
set the
switch
to
the
1/2
OPEN
position. This
will
open
the
lens
iris
by
a
1/2
F
stop