


44 C611M-C (3/06)
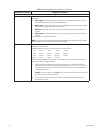
To select one or more particular time slots for additional days of the week, repeat steps a and b above.
– Select an hourly time slot for all days of the week at once. To do so, click the appropriate hour selection button in the top row of
the grid. The entire column in the grid is selected for that particular time slot and is shaded blue.
For example, if you want recording to occur between 9:00 a.m. and 10:00 a.m., click the 9:00 hour selection button. The entire
column is selected and is shaded blue from 9:00 a.m. to 10:00 a.m. for all days of the week.
• To deselect a particular time slot, right-click the time slot. The time slot appears white.
• To select all time slots for all days of the week, click the Select All button.
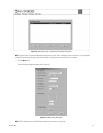
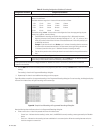
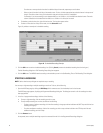
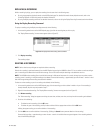
Figure 31 provides an example of a scheduled recording.
Figure 31. Scheduled Recording Example
3. Click the OK button to set the scheduled recording time. (Clicking Cancel prevents the scheduled recording time from being set.)
The Add Recording dialog box or Edit Recording Setup dialog box reappears.
4. Click the OK button. The NVR300 records according to the schedule you set in the Set Recording Time or Edit Recording Time dialog box.
STOPPING A RECORDING
NOTE: Service-level access privileges are required to stop a recording.
You can stop a single recording or multiple recordings at one time. To do so, do the following:
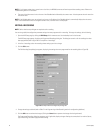
1. Open the NVR-Setup page by clicking the NVR-Setup link for remote access. Use the desktop icon for local access.
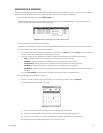
The NVR-Setup page appears, displaying the Programmed Recordings dialog box. The dialog box contains a list of recordings that have
been programmed.
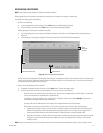
2. In the list of programmed recordings, do either of the following:
• To stop a single recording, click the recording you wish to stop.
• To stop multiple recordings at one time, do either of the following:
–To select a group of adjacent recordings, click the first recording in the group and then hold down the SHIFT key and click the last
recording in the group.
–To select nonadjacent recordings, click the first recording you wish to stop and then hold down the CTRL key and click each
additional recording you wish to stop.
3. Click the Remove button.
As requested, one or multiple recordings stop and are removed from the list in the Programmed Recordings dialog box.