


70 C611M-C (3/06)
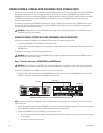
3. Open Windows XP Disk Management as follows:
a. On the Windows XP desktop, right-click the My Computer icon and then click Manage.
The Computer Management window appears.
b. In the left pane of the Computer Management window, locate the Storage item.
c. Under the Storage item, click Disk Management.
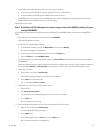
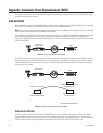
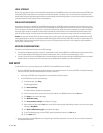
4. Extend the storage volume (Volume D) to the unallocated space in the new drive as follows:
a. Right-click the storage volume, and then click Extend Volume….
The Extend Volume Wizard dialog box appears.
b. Click the Next button.
c. In the Available selection box, click the new drive. Then click the Add button.
The new drive is selected and appears in the Selected box.
d. Click the Next button.
e. Confirm selection of the new drive, and then click the Finish button.
NVR300 storage space on the new drive and storage space on the storage volume are on the same volume (Volume D) and the status is healthy.
REPLACING A DATA STORAGE HARD DISK DRIVE IN A RAID SYSTEM
An NVR300 internal RAID configuration allows for one data storage hard drive failure at a time without the loss of recordings. The failed storage
drive is field replaceable.
When a storage drive fails within an internal RAID configuration, the management application of the NVR300 allows the following notifications
of the failure:
• If pop-up notification is enabled, a pop-up message box indicating that a drive has failed appears on the monitor connected to the NVR300.
Pop-up notification is enabled by default.
• If an e-mail server has been configured, an e-mail containing a text message indicating that a drive has failed is sent to the designated
e-mail address. E-mail notification is disabled by default.
• Failure of a hard disk drive is recorded to the event log file. Event log notification is enabled by default.
(For information about configuring pop-up, audible alarm, e-mail, and event log notification refer to Configure the Script and Configuring Alerts for
an External RAID NVR300 in the Installation section.)
To replace a failed data storage hard disk drive in an internal RAID configuration, do the following:
1. Reduce the number of PelcoNet streams being recorded so that the current total data rate is reduced to 30 Mbps or less. Doing so ensures
that the NVR300 records without gaps when the failed hard drive is replaced.
To reduce the number of PelcoNet streams being recorded, stop the desired recordings (refer to Stopping a Recording in the Operation section).
2. Review the pop-up message and note the port that is in a failed state.
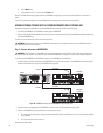
3. Unlock the NVR300 front door using a supplied key.
4. Locate the numbered slot (slot 0, 1, 2, 3, 4, 5, or 6) that corresponds to the port number with the failed storage drive.
5. Remove the failed storage drive from the slot by pressing down on the lock latch of the carrier and then pulling the carrier out of the slot.
The carrier should slide out of the slot.
WARNING: Handle the replacement hard disk drive with care. Improper handling can easily damage the drive. In addition, prevent
electrostatic discharge (ESD) damage to the hard disk drive by following ESD precautions. Always wear a grounding wrist strap that is
connected to an approved grounding source when installing a hard disk drive.
WARNING: Replacing a failed data storage hard disk drive in an internal RAID configuration may cause a loss of recordings.