


C611M-C (3/06) 51
REPLAYING A RECORDING
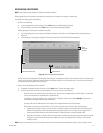
While a recording is playing, you can replay the recording from the start time in the following ways:
• By using the appropriate playback controls on the NVR-Playback page. For detailed information about playback controls, refer to the
Controlling Playback of a Recording section for detailed information.
• By using the Replay recording command. For detailed information, refer to the Using the Replay Recording Command section that follows.
Using the Replay Recording Command
To replay a recording using the Replay recording command, do the following:
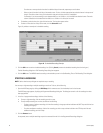
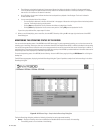
1. In the recording selection area of the NVR-Playback page, right-click the recording that you wish to play.
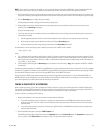
The “Replay/Delete recording” shortcut menu appears (refer to Figure 37).
Figure 37. Replay/Delete Recording Shortcut Menu
2. Click Replay recording.
The recording replays.
DELETING A RECORDING
NOTE: Service-level access privileges are required to delete a recording.
Deletion of a recording is performed remotely from the NVR-Playback page using the VMX300 or client PC. You can select an entire recording or
part of a recording to be deleted from hard disk drive storage. You can also select multiple recordings to be deleted at one time.
NOTE: The NVR300 writes recording files to hard disk drive storage in 180-second increments. As a result, although you may select an entire
recording, part of a recording, or multiple recordings to be deleted, some residual recording—approximately up to two minutes—remains in hard
disk drive storage although the recording was selected for deletion.
To select an entire recording or part of a recording to be deleted, do the following:
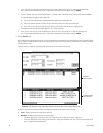
1. In the recording selection area of the NVR-Playback page, click the recording you wish to delete in whole or in part. If the recording is
already selected, skip this step and proceed to step 2.
2. Right-click the selected recording. The “Replay/Delete recording” shortcut menu appears (refer to Figure 37).
3. Click Delete recording.
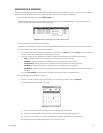
The “Delete recording” dialog box appears containing the start date, end date, start time, and stop time of the recording to be deleted.
4. Do either of the following:
• To delete the entire recording, click the OK button.
• To delete only part of the recording, modify the date and time fields as appropriate and then click the OK button.
A dialog box appears asking you to confirm deletion of the recording.
5. Click the OK button to confirm deletion of the recording. (Clicking the Cancel button prevents deletion of the recording.)
Some residual recording—approximately up to two minutes—remains in hard disk drive storage and appears in the recording selection
area of the NVR-Playback page.