


C611M-C (3/06) 45
SEARCHING FOR A RECORDING
Searching for a recording is performed from the NVR-Playback page remotely using the VMX300 or a client PC. You can search for a recording
based on camera only or based on camera and a specific time period. To search for a recording, do the following:
1. Open the NVR-Playback page by clicking the NVR-Playback link.
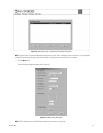
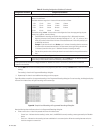
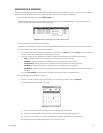
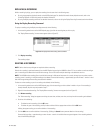
The NVR-Playback page appears. Figure 32 shows the recording search area of the NVR-Playback page. The recording search area is
located in the upper right-hand corner of the NVR-Playback page.
Figure 32. NVR-Playback Page—Recording Search Area
2. From the “Video source” drop-down box, select a camera.
All cameras and associated PelcoNet devices from which the NVR300 stored recordings are listed in the “Video source” drop-down box.
3. From the “Time filter” drop-down box, do either of the following:
• If you want to search for a recording without specifying a time period, choose None (default setting). None allows you to search for
a recording from a list of recordings based on the selected camera only.
• If you want to search for a recording based on a specific time period for the selected camera, click one of the following:
– Today—Allows you to search for a recording from a list of recordings from the current day.
– Yesterday—Allows you to search for a recording from a list of recordings from the previous day.
– Last seven days—Allows you to search for a recording from a list of recordings from the last seven days.
– Last 30 days—Allows you to search for a recording from a list of recordings from the last 30 days.
– User-defined—Allows you to search for a recording from a list of recordings based on particular date and time periods that
you define.
If you select user-defined, continue with step 4 that follows; otherwise, omit step 4 and proceed to step 5.
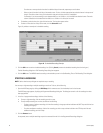
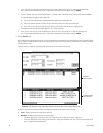
4. (User-defined only) Set a date and time as follows:
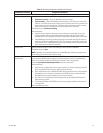
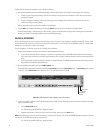
a. From the “From date” entry box, click the arrows button (< >) to enter a date. The default setting is 01-Jan-00.
The Calendar dialog box appears (refer to Figure 33).
Figure 33. Calendar Dialog Box
(1) Enter a month into the calendar by selecting the desired month from the drop-down box.
(2) Enter a year into the calendar by clicking the up or down arrow button and selecting the desired year.
(3) Enter a day into the calendar by clicking the desired day on the calendar. The desired day is highlighted red.
The dialog box closes and the desired date appears in the “From date” entry box.