


C611M-C (3/06) 71
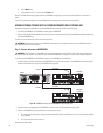
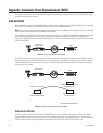
6. Remove the failed storage drive from the carrier as follows:
a. Observe that the drive is held in place by two retention clips on each side of the carrier. The two retention clips on each side of the
carrier latch onto the holes on each side of the drive.
b. Place the carrier containing the drive on a flat surface.
c. Using a small screwdriver, carefully pull the retention clips on one side of the carrier away from the carrier while lifting the drive out
of the carrier. Be careful not to bend the retention clips.
Retain the carrier to hold the new storage drive.
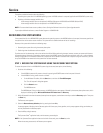
7. Remove the new storage drive from the antistatic wrapping.
8. Using the carrier that held the failed storage drive, insert the new storage drive into the carrier as follows:
a. Orient the drive so that the visible electronics point downward and the connectors point outward.
b. Push the drive into the carrier. Ensure that the two retention clips on each side of the carrier latch onto the holes on each side of the
drive.
9. Insert the carrier containing the new storage drive into the same slot from which the failed hard drive was removed.
NOTE: When inserting the carrier, ensure that the carrier is securely seated in the slot and that the lock latch on the top of the carrier locks into
the hard disk drive bay. (The carrier should not be able to be removed from the slot without pressing the lock latch.)
The NVR300 system detects the new hard drive and the message “BC_Service” appears in a pop-up message box indicating that a new
hard drive drive has been inserted.
10. Lock the NVR300 front door.
11. Click the Rescan button to clear the message box indicating “BC_Service.”
After a few seconds, the message “BC_Service” reappears, indicating that the system has detected a new hard drive and that the
rebuilding of the RAID array has commenced.
NOTE: The rebuilding process requires about 24 hours to complete. During the process, the performance of the NVR300 temporarily slows
down.
12. Click the Rescan button to clear the message box.