


62 C611M-C (3/06)
ADDING EXTERNAL STORAGE WITH DX9200HDDI VIDEO STORAGE UNITS
(For units with no internal storage only.) For expanded storage of NVR300 recordings, two SCSI ports are provided on the rear panel of NVR300
RAID systems (refer to Table A for a list of the applicable models). Each SCSI port can connect to a DX9200HDDI video storage unit. Each
DX9200HDDI unit can contain a maximum storage capacity of 3,500 GB; therefore, a maximum of 7,000 GB of external storage can be added to
the NVR300. (For detailed information about DX9200HDDI video storage units, refer to the DX9200HDDI Series IDE Video Storage Unit
Installation/Operation manual.)
To add external storage with one DX9200HDDI video storage unit, refer to the Adding External Storage with One DX9200HDDI Video Storage
Unit section. If you wish to add external storage with a second DX9200HDDI video storage unit, refer to the Adding External Storage with a
Second DX9200HDDI Video Storage Unit section.
ADDING EXTERNAL STORAGE WITH ONE DX9200HDDI VIDEO STORAGE UNIT
Adding external storage to an NVR300 with one DX9200HDDI video storage unit involves the following steps:
1. Connecting the DX9200HDDI to the NVR300 and powering on the units
2. Using the Windows XP Disk Management tool to extend internal storage volume (Volume D) of the NVR300 by adding disk space from the
DX9200HDDI unit
To perform each of the above steps, refer to the sections that follow.
Step 1. Connect and power on DX9200HDDI and NVR300 units.
To connect one DX9200HDDI to the NVR300 and to power on the units, do the following:
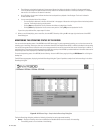
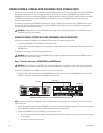
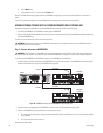
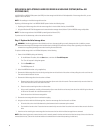
1. Connect the 68-pin SCSI cable provided with the DX9200HDDI from the SCSI In port of Host A on the DX9200HDDI to either of the SCSI
connectors (channel A) on the rear panel of the NVR300 (refer to Figure 44).
Figure 44. NVR300 Connection to One DX9200HDDI Video Storage Unit
NOTE: As shown in Figure 44, the DX9200HDDI unit has two host channels on the rear panel: Host A and Host B. Each channel has a SCSI In
and a SCSI Out port.
2. Connect the power cord supplied with the DX9200HDDI to the unit and to an uninterruptible power supply (UPS). If the power cord supplied
with the NVR300 is not already connected, connect the power cord to the unit and to the UPS.
3. Power on the DX9200HDDI by doing the following on the rear panel of the unit:
a. Turn on the three power supplies by setting each power supply ON/OFF switch to the ON position. You can turn on the power supplies
in any sequence.
b. Turn on the main power switch to the unit.
WARNING: Adding external storage with DX9200HDDI video storage units may degrade the performance of the NVR300 and result in
momentary gaps in the current recording.
WARNING: Adding external storage with a DX9200HDDI video storage unit may degrade the performance of the NVR300 and result in
momentary gaps in the current recording.
WARNING: The configuration of a DX9200HDDI unit is preprogrammed in the factory for RAID 5 or RAID 5 plus hot spare based on the
order received. Do not attempt to change the configuration of the DX9200HDDI unit. Doing so can cause the unit to become inoperable.
2
CHANNEL A
NVR300
SCSI CABLE
DX9200HDDI
STORAGE
HOST A
HOST B