


10
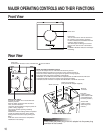
MAJOR OPERATING CONTROLS AND THEIR FUNCTIONS
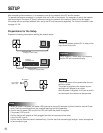
Front View
Dome cover
Power LED
You can select ON or OFF for the LED on
the "System" page. (Refer to page 63.)
If ON is selected, this LED blinks when the
camera is being accessed.
This LED keeps on blinking for around 2
minutes even after access is terminated.
Note:
In MPEG-4 Multicast mode, the LED keeps
on blinking.
Rear View
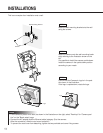
HTML document initialization switch
Plug the AC adapter into an outlet while this switch is pressed.
Keep the switch pressed for five seconds or more, and then release it.
Leave the camera without turning the power off (power is being supplied).
The camera will start panning and tilting automatically.
Initialization of all HTML documents will be completed and all HTML documents will return
to the default settings when the camera stops panning and tilting.
It will take around 4 minutes to complete the initialization of all HTML documents.
Setting reset switch
Plug the AC adapter into an outlet while this
switch is pressed.
Keep the switch pressed for five seconds or
more, and then release it.
Leave the camera without turning the power off
(power is being supplied).
The camera will start panning and tilting
automatically.
Initialization of all the settings will be completed
and all the settings will return to the default
settings when the camera stops panning and
tilting.
It will take around 3 minutes to complete the
initialization of all settings.
Cord cover
To detach the connector cover, hold down the part and slide it.
Alarm connector
Power plug connector
(Only use the AC adapter supplied)
Ethernet
connector
Link LED
(Lights up when
communication with
connected devices
becomes possible.)
Access LED
(Lights up when
accessing to the
network.)
Inside of the cord cover
Firmly insert the power plug of the AC adapter into the power plug
connector of the camera.
! Important