


21
Recording
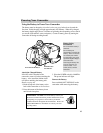
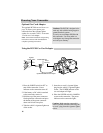
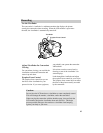
1. Attach a power supply.
Attach the adapter/charger, charged
battery, or optional DC car cord.
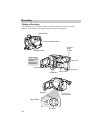
2. Insert a tape.
• Press PUSH/OPEN to open the LCD
monitor. Open the monitor at least
60º before opening the cassette
compartment.
• Press EJECT to open the cassette
compartment.
• Turn the tape wheel on the cassette
to remove any slack from the tape.
• Insert the cassette with the tape
wheel facing up and the tape
window facing out.
• Press the PUSH button on the side of
the cassette compartment to lock the
cassette holder into place.
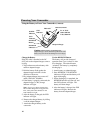
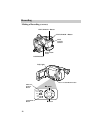
3. Slide the LENS COVER control to
open the lens cover.
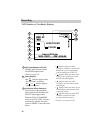
4. Place the POWER switch in
CAMERA.
The power indicator will light and the
camcorder will enter record pause.
appears in the viewfinder or
on the LCD monitor.
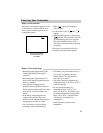
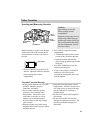
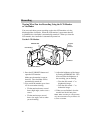
5. Use the LCD monitor or viewfinder
to view what you are recording.
Use the LCD Monitor
• Make sure the monitor is open at
least 60º. The viewfinder will be
automatically turned off.
• Tilt the LCD monitor (up to 45º up
or down).
• Adjust the brightness of the image
by turning the BRIGHT dial.
PAUSE
Use the Viewfinder
• Make sure the monitor is closed and
locked. The viewfinder will be
automatically turned on.
• Adjust the viewfinder for a
comfortable viewing position.
• Turn the eyepiece focus control to
adjust the focus of the viewfinder for
your vision.
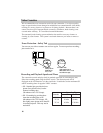
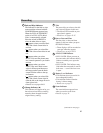
6. Select a recording speed and tape
length.
A. Place the SP•EP switch in SP or EP
to select a recording speed.
B. Make sure the FULL AUTO/
PRESET switch is in PRESET.
C. Press the MENU button and use the
or button to highlight TAPE
LENGTH. Use and to select
the length of the tape you are using
(T20, T30, or T40) so the
camcorder can correctly calculate
the time remaining. Press the
MENU button again to remove the
menu.
(continued on next page)