


6
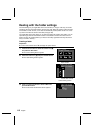
Move the subject as desired.
œ Repeat steps 5 and 6 until your animation shooting is
completed.
7
Complete the animation shooting.
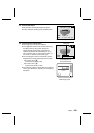
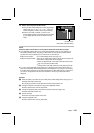
1 Press the power button to turn on the monitor and
press the MODE button.
œ The Animation Shooting Completion Screen
appears.
2 Press j or l to select the desired option.
CONTINUE: Resumes the animation
shooting
BUILD MOVIE: Uses the temporary data
captured to create a video clip
and ends the animation
shooting
DISCARD DATA: Erases the temporary data
captured and ends the
animation shooting
EXIT: Stops the animation shooting
3 Press the SET button.
œ If you selected “CONTINUE,” the animation shooting resumes.
œ If you selected “BUILD MOVIE,” “PROCESSING” appears and the temporary data is
used to create a video clip. When this is completed, the animation shooting is ended.
œ If you selected “DISCARD DATA,” the temporary data is erased. See step 2 on page
111.
œ If you selected “EXIT,” the animation shooting is stopped with the images captured
stored as temporary data. In this condition you can perform all of the functions of the
digital disk camera except for animation shooting and video clip interval shooting
(see page 101). If you attempt to perform animation shooting, the Animation
Shooting Error Screen (see page 109) will appear, and if you attempt to perform
video clip interval shooting, the Video Clip Interval Shooting Error Screen (see page
102) will appear. Follow the instructions given for those screens.
œ The digital disk camera cannot be turned off during animation shooting. You will need to
first end the animation shooting and then turn off the digital disk camera.
œ Once the video clip is created from the temporary data, the video clip can be viewed just
as a normal video clip (see page 63). Check the video clip and then erase the temporary
data (see page 111).
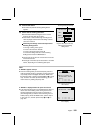
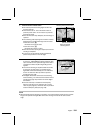
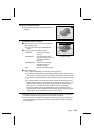
ANM. 30FPS
DUR. 0:00:05.01
ANIMATION
INTERRUPTED
CONTINUE
ÄBUILD MOVIE
DISCARD DATA
EXIT
ANM. 30FPS
DUR. 0:00:10.02
Animation Shooting
Completion Screen
English
110