Camfire PC Installation and User's Guide 1
Camfire PC Whiteboard Camera System
With the Camfire PC system, you can write notes, create schedules and draw diagrams on
your whiteboard, and then save an image of these notes in one step. To do this, simply use
the capture slide on the whiteboard, click the Camfire button in Notebook™ software, or use
the toolbar commands that are available from the Camfire PC icon in your system tray. The
digital cameras in the camera boom then take a high-resolution, color image of everything
you’ve written, drawn or posted on the whiteboard.
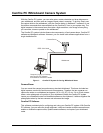
The Camfire PC system includes three main components: a fixed camera boom, Camfire PC
software and Notebook software. However, you can install both software applications from a
single installation file.
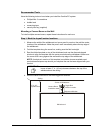
Computer (Laptop or Desktop)
with Camfire PC Software
and Notebook Software Installed
Whiteboard
Camera Boom
IEEE 1394 Cable
Figure 1: Camfire PC System for Saving Whiteboard Notes
Camera Boom
You can mount the camera boom above any standard whiteboard. This boom includes two
digital cameras, each with fixed focus and auto exposure. Together, the two cameras can
capture the notes on a whiteboard as large as 4 ft. H x 8 ft. W (1.2 m x 2.4 m). Each camera
takes a color photograph of a portion of your whiteboard. Before the Camfire PC system
inserts your whiteboard notes into Notebook software or the clipboard, it stitches together the
photographs taken by the two cameras and enhances the image.
Camfire PC Software
This software provides tools for configuring and using your Camfire PC system. With Camfire
PC software, you can refine the image alignment, name and reorder multiple camera booms,
enable or disable the capture slide, update camera software, and capture your whiteboard
notes.


