


114
Cleaning Kit (optional), do not apply the
cleaning liquid directly to the LCD screen.
Use cleaning paper moistened with the
liquid.
On handling the casing
• If the casing is soiled, clean the camcorder body
with a soft cloth lightly moistened with water,
and then wipe the casing with a dry soft cloth.
• Avoid the following to avoid damage to the
finish.
– Using chemicals such as thinner, benzine,
alcohol, chemical cloths, repellent, insecticide
and sunscreen.
– Handling with above substances on your
hands.
– Leaving the casing in contact with rubber or
vinyl objects for a long period of time.
About care and storage of the lens
• Wipe the surface of the lens clean with a soft
cloth in the following instances:
– When there are fingerprints on the lens
surface.
– In hot or humid locations
– When the lens is exposed to salty air such as
at the seaside.
• Store in a well-ventilated location subject to
little dirt or dust.
• To prevent mold, periodically clean the lens as
described above. It is recommended that you
operate your camcorder about once a month to
keep it in optimum state for a long time.
On charging the pre-installed
rechargeable battery
Your camcorder has a pre-installed
rechargeable battery to retain the date, time,
and other settings even when the POWER
switch is set to OFF. The pre-installed
rechargeable battery is always charged
while your camcorder is connected to the
wall socket via the AC Adaptor or while the
battery pack is inserted. The rechargeable
battery will be fully discharged in about 3
months if you do not use your camcorder
at all without the AC Adaptor connected or
the battery pack attached. Use your
camcorder after charging the pre-installed
rechargeable battery.
However, even if the pre-installed
rechargeable battery is not charged, the
camcorder operation will not be affected as
long as you are not recording the date.
x Procedures
Connect your camcorder to a wall socket
using the optional AC Adaptor, and leave it
with the POWER switch set to OFF for
more than 24 hours.
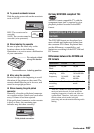
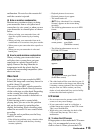
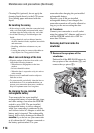
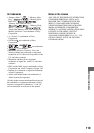
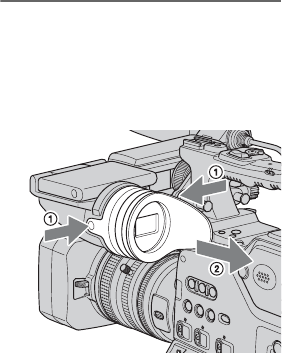
Removing dust from inside the
viewfinder
1 Remove the eye piece of the
viewfinder.
Push and hold the RELEASE buttons in
the eye piece of the viewfinder (1), and
remove the eye piece (2).
Maintenance and precautions (Continued)