


Chapter 3 Recording and Playback
43
3-2 Recording
1
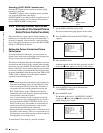
Holding down the MENU knob, move the MENU ON/
OFF switch from OFF to ON.
The TOP menu appears.
2
Turn the MENU knob to move the b mark to
“MAINTENANCE”.
3
Press the MENU knob.
If this is the first time the MAINTENANCE menu has
been displayed, the CONTENTS page of the menu
appears. If the menu has been used before, the last
accessed page appears.
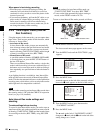
4
If the CONTENTS page is displayed, turn the MENU
knob to move the b mark to “ESSENCE MARK”,
then press the MENU knob.
If a different page is displayed, turn the MENU knob
until the ESSENCE page appears, then press the
MENU knob to select the page.
The items show the following types of essence marks.
SHOT MARK 1/2: Recorded manually.
OVER AUDIO LIMIT: Recorded when the audio
level exceeds 0 dBFS.
GAIN CHG. MARK: Recorded when the gain value
is changed.
FILTER CHG. MARK: Recorded when the filter is
changed.
SHUTTER CHG. MARK: Recorded when the
shutter speed is changed.
WHITE CHG. MARK: Recorded when the white
balance is changed.
FLASH MARK: Recorded when a sudden brightness
change occurs as when the flash operates or when
the camcorder in recording mode is suddenly
moved into an indoor space from a bright outdoor
space.
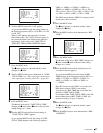
5
Turn the MENU knob to move the b mark to “SHOT
MARK 1”.
6
Press the MENU knob.
The b mark to the left of “SHOT MARK 1” changes
to a z mark and the z mark to the left of the setting
changes to a ? mark.
7
If you want to record the essence mark, turn the
MENU knob to display “ON”. If you do not want to
record it, turn the MENU knob to display “OFF”.
8
Press the MENU knob.
9
Repeat steps 5 to 8 to set the remaining essence marks.
10
When FLASH MARK is “ON”, use the FLASH
MARK LEVEL item to set the threshold brightness
value (in the range 1 to 20) for essence mark
recording.
11
Set the MENU ON/OFF switch to OFF to end the
menu operation.
Recording a SHOT MARK 1 essence mark
Press the RET button once.
“ShotMark1” appears on the viewfinder screen for about
one second near the time code display.
If SHOT MARK 1 recording has been assigned to one of
the assignable switches, you can also use that switch to
record a SHOT MARK 1 essence mark.
See section 7-3-5 “Assigning Functions to ASSIGN 1/2/3/
4 Switches” (page 133) for more information about how to
make assignments.
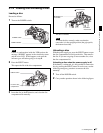
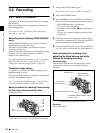
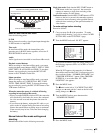
MENU knob
MENU ON/OFF
switch
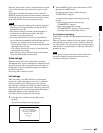
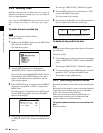
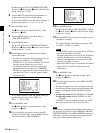
?M10 ESSENCE MARK TOP
SHOT MARK 1 : OFF
SHOT MARK 2 : OFF
OVER AUDIO LIMIT : OFF
GAIN CHG. MARK : OFF
FILTER CHG. MARK : OFF
SHUTTER CHG. MARK: OFF
WHITE CHG. MARK : OFF
FLASH MARK : OFF
FLASH MARK LEVEL : 10
INDEX PIC. POS. : 0SEC
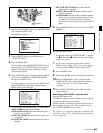
M10 ESSENCE MARK TOP
SHOT MARK 1 : OFF
SHOT MARK 2 : OFF
OVER AUDIO LIMIT : OFF
GAIN CHG. MARK : OFF
FILTER CHG. MARK : OFF
SHUTTER CHG. MARK: OFF
WHITE CHG. MARK : OFF
FLASH MARK : OFF
FLASH MARK LEVEL : 10
INDEX PIC. POS. : 0SEC