


Preparation
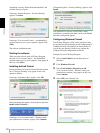
Basic Configuration by the Administrator
15
Basic Configuration by
the Administrator
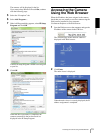
You can monitor the image of the camera by logging in
with the initial condition of this network camera. You
can also set various functions according to the install
position, network condition or purpose of the camera.
We recommend you configure the following items
before monitoring the image from the camera.
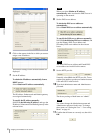
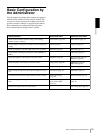
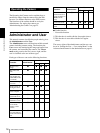
Setting contents Easy mode menu Advanced mode menu
Select the white balance mode according to the installing
position (indoor or outdoor).
White balance (page 26) White balance (page 35)
Flip the image according to the installation position (desk top or
ceiling).
Mount (page 26) Image flip (page 35)
Select the brightness of the blue LED on the top of the camera. Blue LED (page 26) Blue LED (page 31)
Set the format of the image sent from the camera (MPEG 4 or
JPEG).
– Video mode (page 34)
Select the brightness of the image sent from the camera. Brightness (page 26) Exposure mode (page 36)
Brightness (page 36)
Select the quality of the image sent from the camera. Image quality (page 26) MPEG4 Tab (page 36)
JPEG Tab (page 37)
Select the size of the image sent from the camera. Image size (page 26) Image size (page 34)
Select weather the audio from the camera microphone is sent or
not.
Microphone (page 26) Microphone (page 35)
Accord date and time of the camera with those of the computer. Date & time setting
(page 26)
Date & time Tab (page 31)
Make the setting for sending the monitor image attached to a
mail.
e-Mail (SMTP) (page 26)
Easy mode (e-Mail)
(page 27)
e-Mail (SMTP) setting Menu
(page 43)
Set the access right of the user for the camera. – User setting Menu (page 41)