


Getting started
27-GB
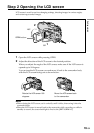
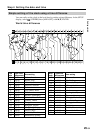
6 Close the disc cover.
Your camcorder starts recognising the inserted disc.
With a DVD-R, you can start recording immediately after DISC ACCESS
disappears on the LCD display. See page 29 for details on shooting movies and
see page 34 for details on shooting still images.
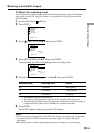
The FORMAT display appears when you insert a DVD-RW. Proceed to step 7.
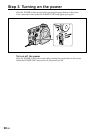
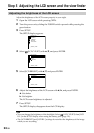
7 When recording in VIDEO mode, select [EXECUTE] and [YES] with b/v/V/
B, then press ENTER.
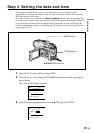
When recording in VR mode (page 7):
1 Select [REC FORMAT] with v/V, then press ENTER.
2 Select [VR] with v/V, then press ENTER.
3 Select [EXECUTE] with v/V, then press ENTER.
4 Select [YES] with v/V, then press ENTER.
The disc formatting starts. When the formatting is completed, you can start
recording on the DVD-RW.
Notes
•If you close the disc cover with the disc set incorrectly, it may cause your camcorder to
malfunction.
•Do not shock or vibrate your camcorder during “DISC ACCESS” appearing.
•It may take some time to recognise the disc depending on the disc type and condition.
•You may hear the motor running when the disc cover is closed without a disc being
set. This is not a malfunction.
•Do not remove the battery pack or disconnect the AC adaptor while formatting.
•See page 133 for details on disc handling.
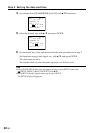
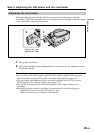
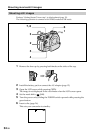
To eject the disc
1 Perform the steps 3 and 4 on page 26.
2 Take out the disc after the disc spin stops completely.
Note
You can open the disc cover only while the Access/Open lamp is lit in green.
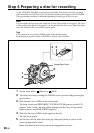
On disc information
When you replace a disc, disc information such as the date you started to use it and
information on previously recorded areas appears for about 5 seconds. The information
on previously recorded areas may not be displayed correctly depending on the
condition of the disc.
Step 6 Preparing a disc for recording
REC FORMAT
EXECUTE
FORMAT
VIDEO
EST. PROCESS TIME : 7sec
REC FORMAT : VIDEO