


58 Brocade Network Advisor Installation and Migration Guide
53-1003373-01
Migrating data
3
12. (SAN Enterprise or SMI Agent) Select one of the following options on the SAN Network Size
screen and click Next:
NOTE
Port count is equal to the total number of switch ports across all fabrics.
• Small (managing up to 2000 switch ports, 1-20 domains)
• Medium (managing up to 5000 switch ports, 21-60 domains)
• Large (managing up to 15000 switch ports, 61-120 domains)
If you are configuring IP Enterprise, continue with step 13; otherwise, go to step 14.
13. (IP Enterprise) Select one of the following options on the IP Network Size screen and click Next:
NOTE
Port count is equal to the total number of all managed product ports.
• Small (managing up to 1-20 products)
• Medium (managing up to 21-200 products)
• Large (managing up to 201-5050 products)
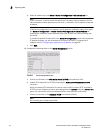
14. Enable feature usage data transfer from the application by selecting the Yes, I want to
participate option.
You can stop participating at any time. To view an example of the usage data, click View
Example Data.
To stop participating in feature usage data transfer after configuration, refer to “Product
improvement” on page 39.
15. Verify your configuration information on the Server Configuration Summary screen and click
Next.
16. Complete the following steps on the Start Server screen.
a. (Trial and Licensed only) Select the Start SMI Agent check box, if necessary.
b. (Trial and Licensed only) Select the Start SLP check box, if necessary.
c. Select the Start Client check box, if necessary.
d. Click Finish.
After all of the services are started, the Log In dialog box displays.
To make changes to the configuration, you can re-launch the configuration wizard (refer to
“Configuring an explicit server IP address” on page 38).
17. Enter your user name and password.
The defaults are Administrator and password, respectively. If you migrated from a previous
release, your user name and password do not change.
NOTE
Do not enter Domain\User_Name in the User ID field for LDAP server authentication.
18. Click Login.
19. Click OK on the Network Advisor Login Banner.