


EN Camera Series
14 Getting Started
2.2.2 (a) Changing the IP Address of the EN Camera Using the EN Setup Software
You can use the EN setup software to change the IP address of the camera. Use the steps below.
1. First, set up your PC's network setting properly so that your PC has the 10.0.0.XX subnet.
However, XX must not be 65, because the host PC's IP address cannot be the same as that of the
camera. The subnet address must be 255.255.255.0.
2. Next, open the EN setup software. If you are starting this software for the first time, you will be
asked to type your password. Your case-sensitive user name and password are as follows:
User name: Administrator
Password: Password
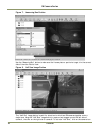
3. Click the "Properties" button. You will see the EN cameras that are in the network.
4. Click the icon of the camera you want to change. Once it is selected, find the "IP address"
register and change the IP address of the camera.
5. Right-click on the camera icon and select "Reboot." This option will reboot the camera.
6. The camera will now start up with a new IP address.
2.2.2 (b) Changing the EN Camera IP Address Using the Debug RS-232 Serial/ Power Cable
You can use the debug RS-232 serial/power cable to access the BIOS menu and change the IP
address of the camera. To do so, follow the steps below.
1. First set up your hyper terminal as 9600-8-N-l. Start up the camera. You should now see the
BIOS start-up code.
2. Type "/" to stop the normal camera boot-up and to start the BIOS test mode.
3. Type "3" to select the "IP address change" setting.
4. Type "1" to select the first network interface, and then "1" again to change the local IP address.
5. Type the IP address you want to change.
6. Type "0" to return to the main menu, and then type "0" to start up the normal boot-up.
2.3 Installing the Required Software
The EN setup software is used to change the registers of the camera parameters, display live video
images, and sniff hardware/trigger Ethernet from the lane controller. To install the software
required for the EN camera, run "Setup.exe" from the CD-ROM. This will guide you through the
proper installation. Once the software is loaded on your system, find the "EN Setup" software from
the Start menu (Start -> EN Setup -> EN Setup). If you are logging in for the first time, you must
enter the following case-sensitive user name and password:
User Name: Administrator
Password: Password
Once you log in as Administrator, you can create a new user and set a custom password.
To set the properties of each camera connected to the network, follow the steps below:
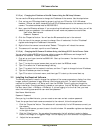
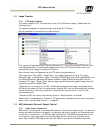
1. Click the "Properties" button. The software will automatically find all EN cameras currently on
the network.
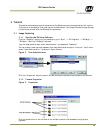
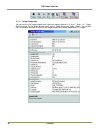
2. Select the EN camera you want to see in the left window. All accessible registers are displayed
in the right window.
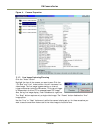
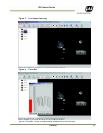
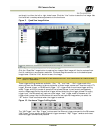
3. Click the "Video" button. You can select the cameras in the left window in order to display
either a live image, or a triggered image. You can display up to four cameras in a single screen.
4. .Adjust the lens as needed.