


16 EN
GETTING STARTED
(cont.)
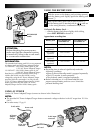
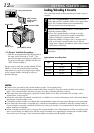
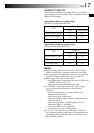
TYQUAL I
UXGA
STANDARD
AUTO
GAVSIZE
–
–
–
NRETUR
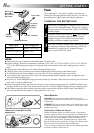
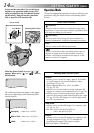
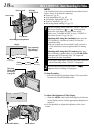
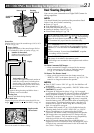
Display
Menu Screen
MENU Wheel
Power Switch
Lock Button
Power Lamp
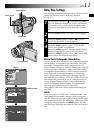
Picture Mode Setting
The Picture mode can be selected to best match your
needs.
1
Set the Power Switch to “ ” while pressing down
the Lock Button located on the switch, and open the
LCD monitor fully or pull out the viewfinder fully.
The power lamp lights and the camcorder turns on.
2
Press the MENU wheel. The Menu Screen appears.
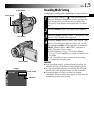
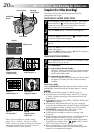
3
Rotate the MENU wheel to select “ DSC” and
press it. The DSC Menu appears.
4
Rotate the MENU wheel to select “QUALITY” and
press it. The Sub Menu appears. Rotate the MENU
wheel to select the desired mode and press it.
If you are recording with the Shooting Mode Switch
(
੬
pg. 14) set to “XGA/VGA” . . . go to step 5.
If you are recording with the Shooting Mode Switch
set to “UXGA” . . . go to step 6.
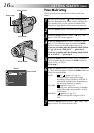
5
Rotate the MENU wheel to select “SIZE” and press it.
The Sub Menu appears. Rotate the MENU wheel to
select “XGA” or “VGA”.
Go to step 7.
6
Rotate the MENU wheel to select “UXGA” and press
it. The Sub Menu appears. Rotate the MENU wheel to
select the desired mode.
AUTO : or appears (੬ pg. 21).
Automatically processes the image
according to the DOUBLE or ENLARGE
methods described below, depending on
the shooting situation or subject.
DOUBLE : appears (੬ pg. 21).
Engages pixel-shift technology to double-
expose the image and generate a UXGA-
sized picture.
ENLARGE : appears (੬ pg. 21).
Digitally enlarges the image to UXGA
size.
7
Rotate the MENU wheel to select “ RETURN”, and
press it twice. The Menu Screen closes.