


58 EN
DUBBING
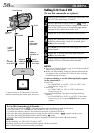
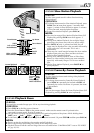
Dubbing To Or From A VCR
[To use this camcorder as a player]
1
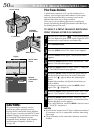
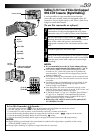
Following the illustration, connect the camcorder and
the VCR. Also refer to pg. 54 and 55.
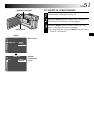
2
Set the camcorder’s Power Switch to “ ” while
pressing down the Lock Button located on the switch,
turn on the VCR’s power, and insert the appropriate
cassettes in the camcorder and the VCR.
3
Engage the VCR’s AUX and Record-Pause modes.
4
Engage the camcorder’s Play mode to find a spot just
before the edit-in point. Once it is reached, press
4
/6 on the camcorder.
5
Press
4
/6 on the camcorder and engage the VCR’s
Record mode.
6
Engage the VCR’s Record-Pause mode and press
4
/6 on the camcorder.
7
Repeat steps 4 through 6 for additional editing, then
stop the VCR and camcorder when finished.
NOTES:
●
You can use Playback Zoom (
੬
pg. 63) or Playback Special
Effects (
੬
pg. 64) in step 5.
●
Before you start dubbing, make sure that the indications do
not appear on the connected TV. If they do, they are being
recorded onto the new tape.
To choose whether or not the following displays appear
on the connected TV . . .
•Date/Time
.....set “DATE/TIME” to “AUTO”, “ON” or “OFF” in the
Menu Screen (
੬ pg. 41).
•Time Code
.....set “TIME CODE” to “ON” or “OFF” in the Menu
Screen (
੬
pg. 41).
•Playback Sound Mode, Tape Speed And Tape Running
Displays
.....set “ON SCREEN” to “LCD” or “LCD/TV” in the Menu
Screen (
੬ pg. 41). Or, press DISPLAY on the remote
control.
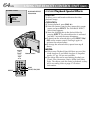
VCR
Connector
cover**
TV
To AV
To
S-VIDEO
Audio/
Video cable
(provided)
White to
AUDIO L IN
Red to
AUDIO R
IN or OUT
To
S-VIDEO
IN or OUT
S-Video
cable
(provided)
* Connect when an S-Video cable is not used.
** When connecting the cables, open this cover.
Yellow to
VIDEO IN
or OUT*
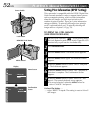
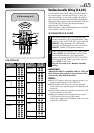
To Use This Camcorder As A Recorder . . .
1. Set the Power Switch to “ ” while pressing down the Lock Button located on the switch.
2. Set “S/AV INPUT” to “ON” and set “REC MODE” to “SP” or “LP” (
੬ pg. 41).
3. Connect the cables as shown in the illustration and load a cassette to record on.
4. Press the Recording Start/Stop button to engage the Record-Pause mode. “
AV. IN
” appears on the screen.
5. Press the Recording Start/Stop button to start recording.
rotates.
6. Press the Recording Start/Stop button again to engage the Record-Pause mode.
stops rotating.
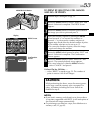
NOTES:
●
After dubbing, set “S/AV INPUT” back to “OFF”.
●
Analog signals can be converted to digital signals with this procedure.
●
It is also possible to dub from another camcorder.
Power Switch